OPNsense and Wireguard Road Warrior Setup

Goal
This guide walks you through the process of establishing a secure 'Road Warrior' setup. You'll learn how to configure a WireGuard (WG) VPN tunnel between your mobile phone and an OPNsense/pfSense router. By the end of this guide, you'll have secure, remote access to your home network.
What is WireGuard?
WireGuard® is a cutting-edge VPN protocol, known for its simplicity, robust security, and superior performance. Designed to be easy to use and highly efficient, it supports multiple platforms, making it a versatile choice for VPN users.
Key Features of WireGuard
-
User-friendly: WireGuard's straightforward setup process and support for IP address roaming make VPN management a breeze.
-
Secure: Built on advanced cryptographic techniques, WireGuard ensures a safe and secure connection.
-
Minimal Attack Surface: The simplicity of WireGuard’s design reduces potential security vulnerabilities.
-
High-Speed: WireGuard is built for speed, ensuring secure, fast networking across all devices.
-
Thoroughly Reviewed Design: WireGuard's design philosophy is based on a meticulously peer-reviewed academic paper, which can be accessed [here](https://www.wireguard.com/papers/wireguard.pdf).
Part A: Set Up Your Router
Tunnel Configuration
First, we will create the WireGuard tunnel.
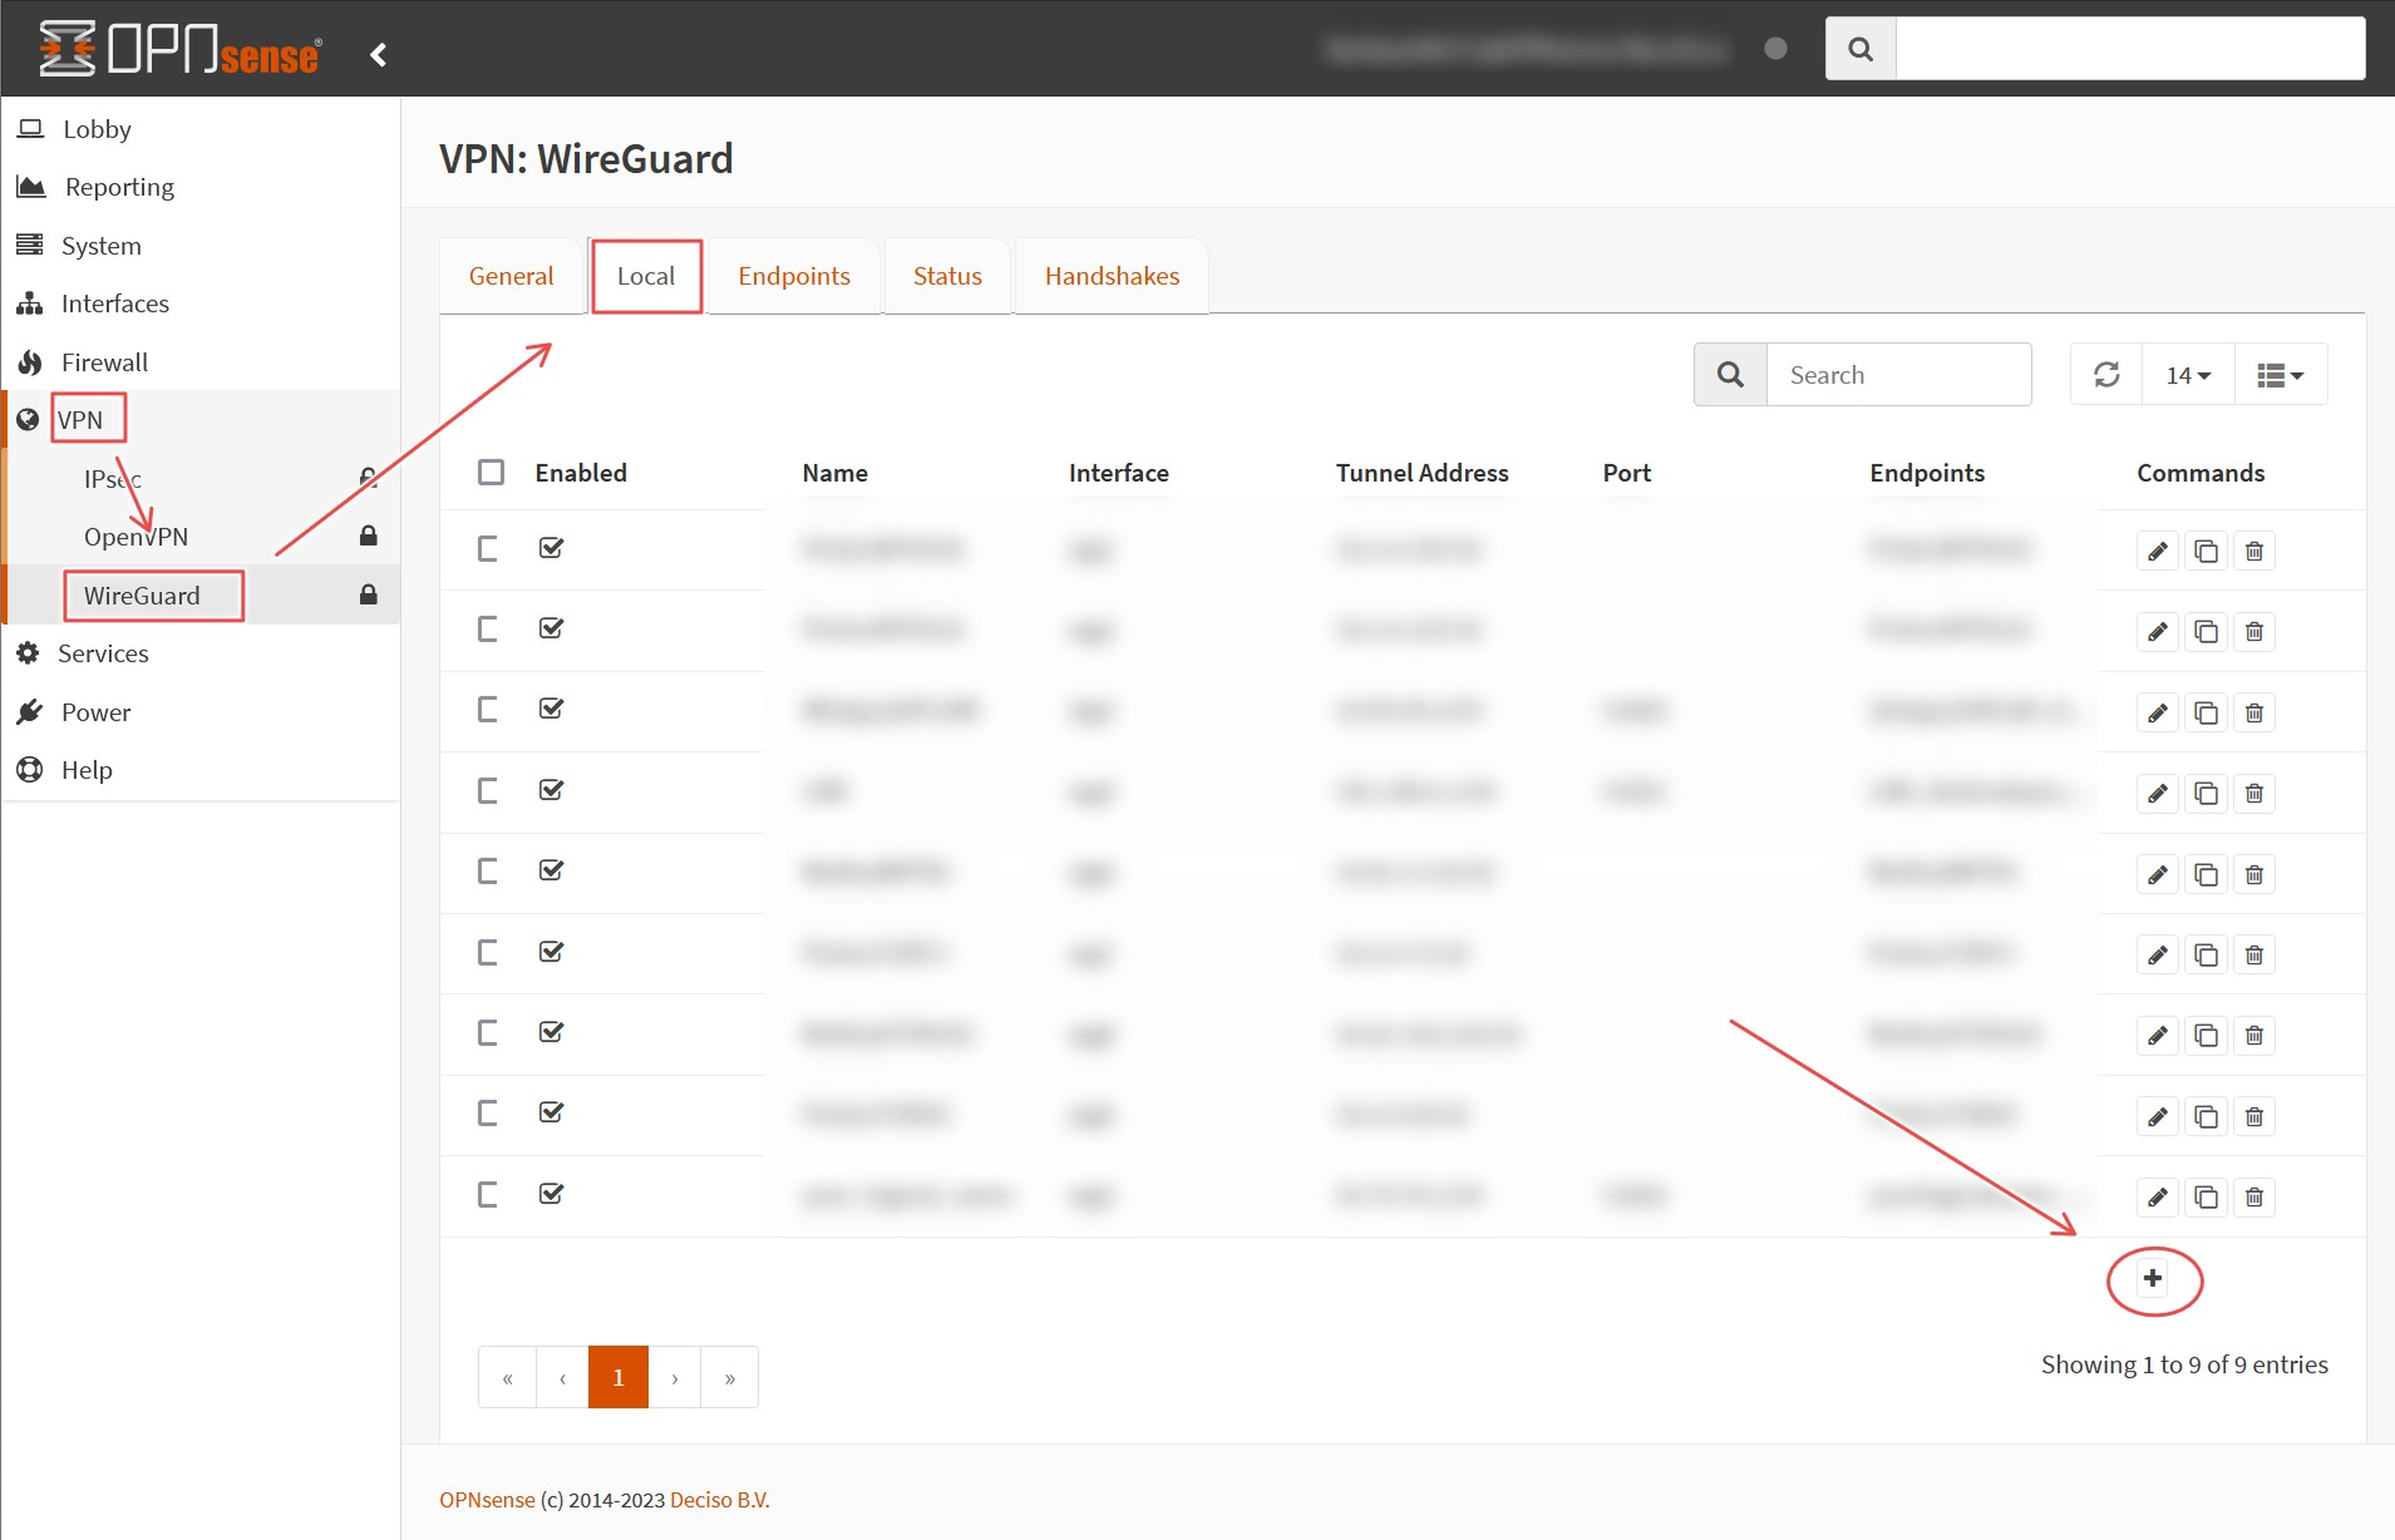
a. Navigate to `VPN -> WireGuard -> Local` Click the `+` button.
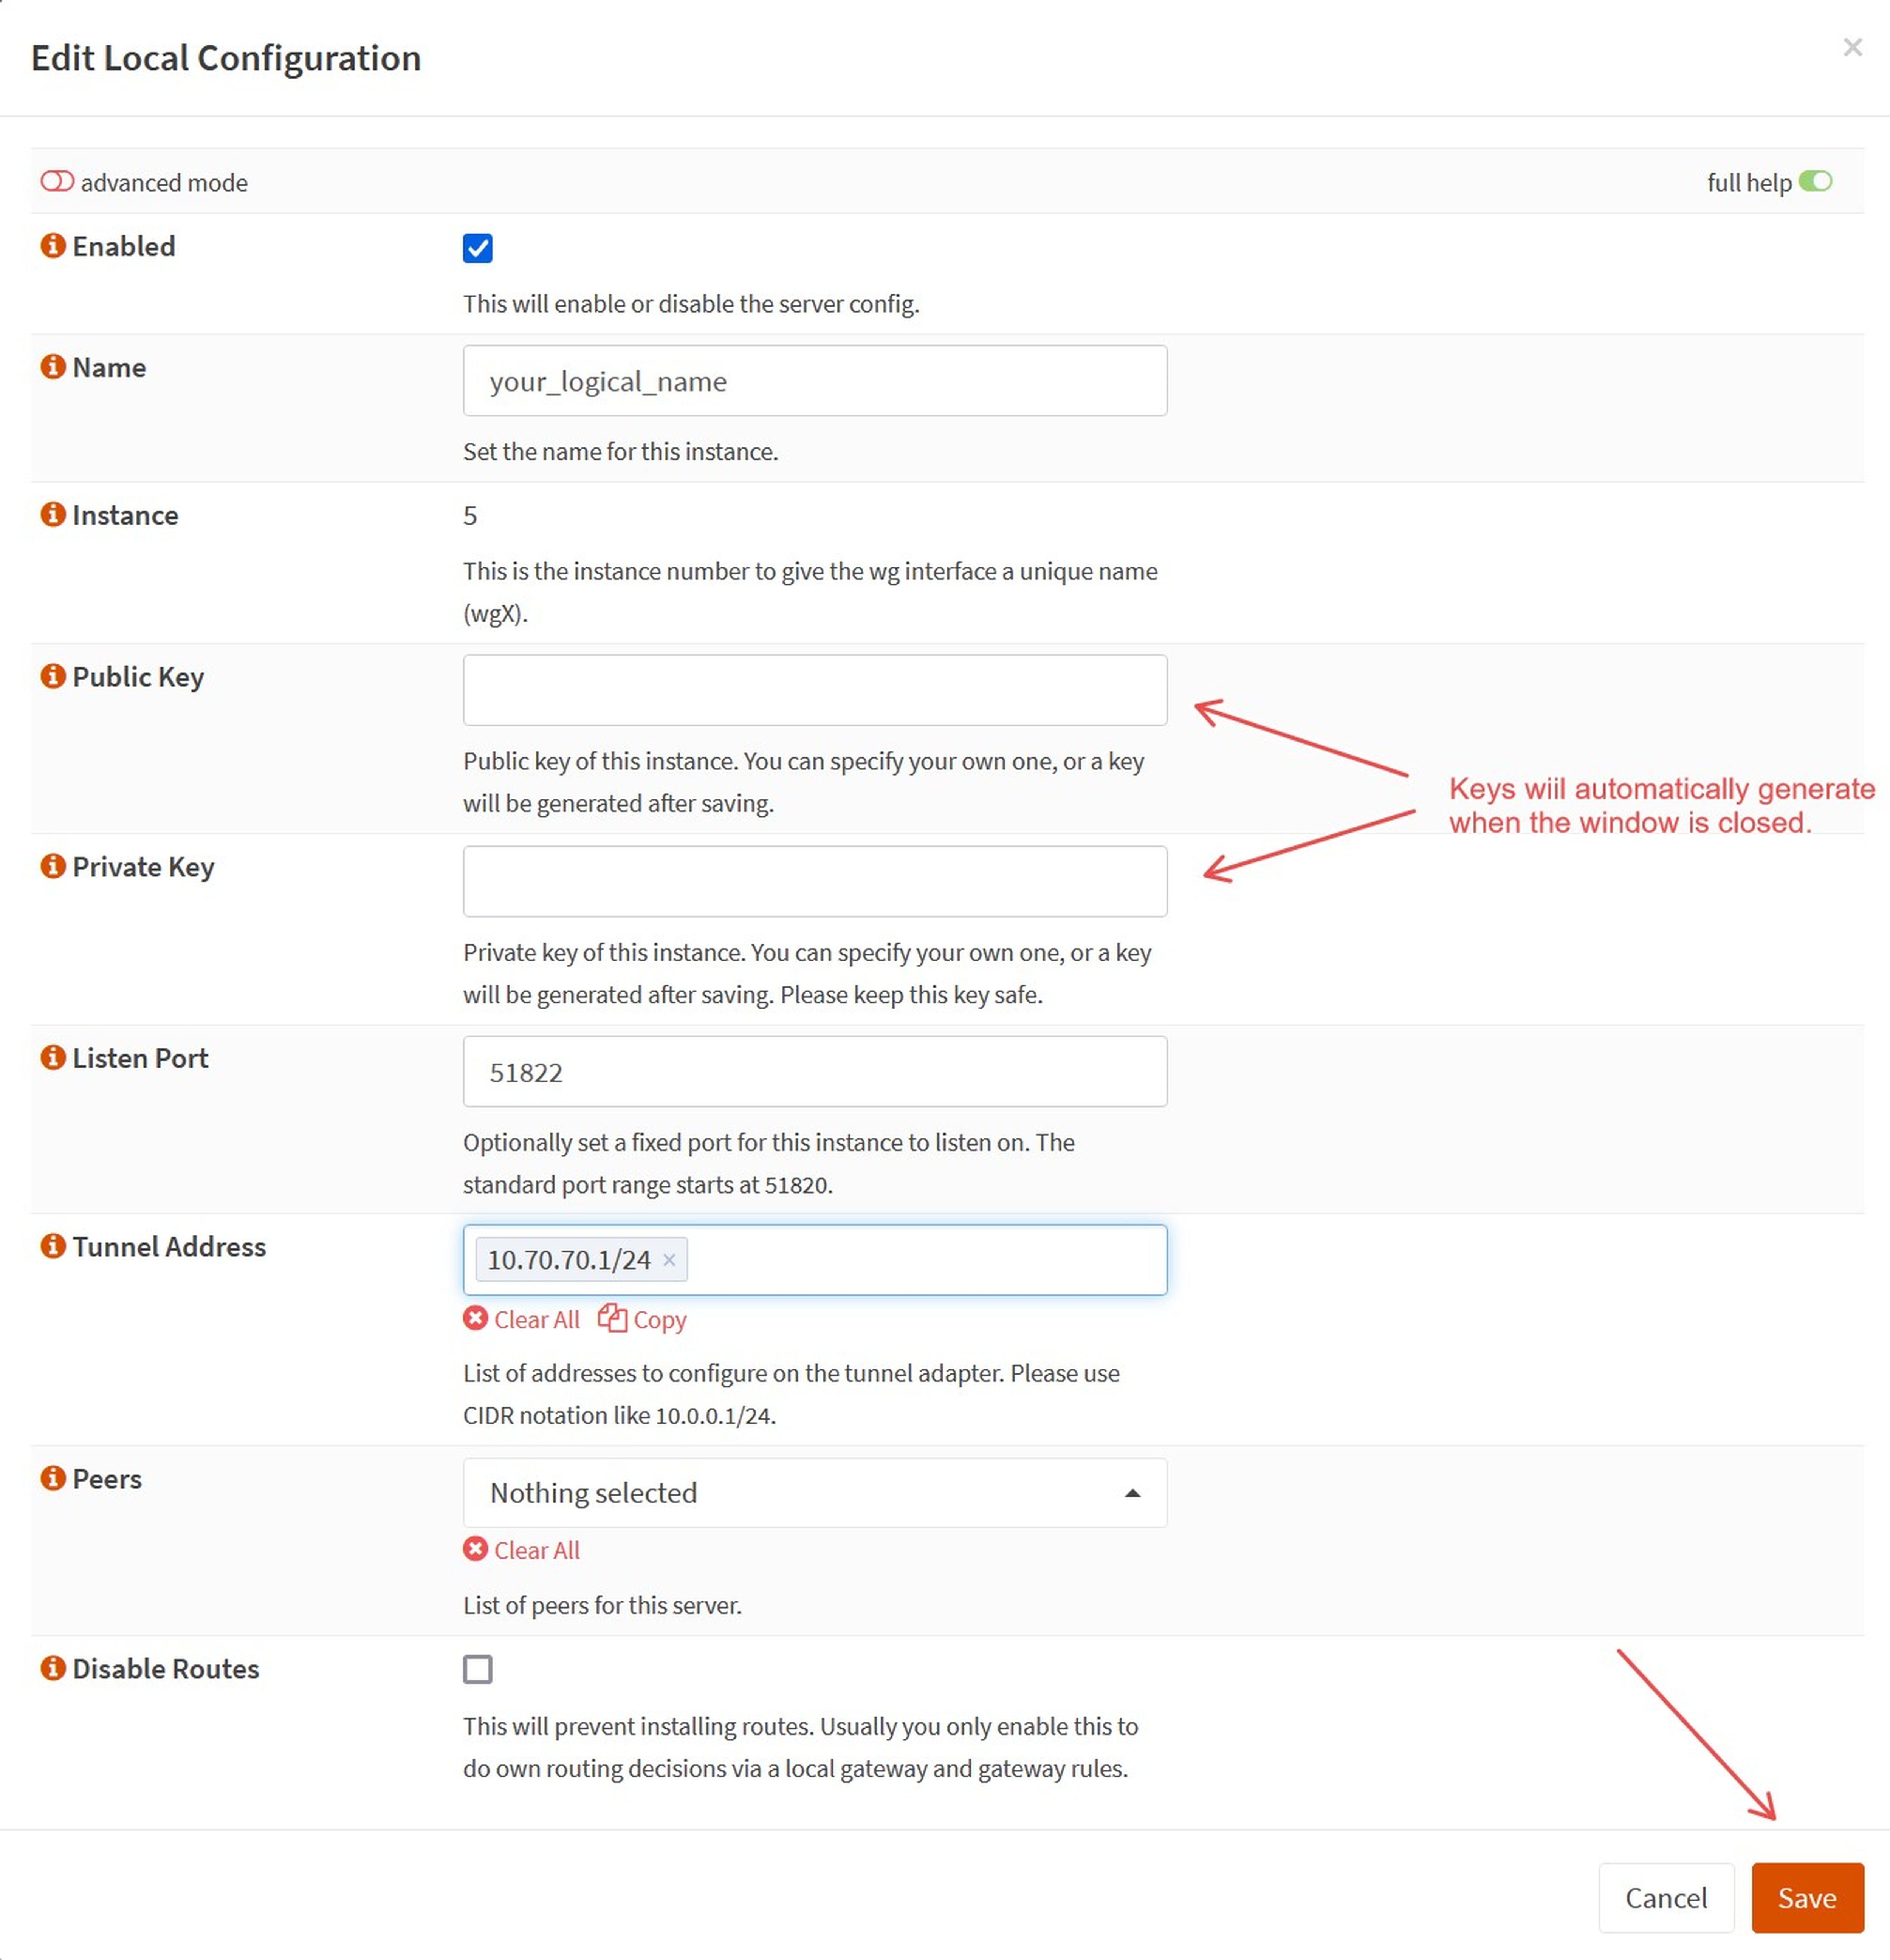
 b. In the Local Configuration window, fill out the required fields.
| Option | Value |
|---|---|
| Name | `your_logical_name` |
| Tunnel address | `10.70.70.1/24` Choose a unique private IP range using CIDR notation. |
| Listening port | The default is 51820. In this guide, we’re using `51822`. |
c. Leave everything else default. Upon closing, the public and private keys will automatically generate. We will come back to these later.
d. `Save` and close the configuration window.
e. Apply the configuration by clicking `Apply`.
If you have more than one WireGuard interface listening, make the listening port number unique between interfaces.
WireGuard Interface Configuration
Here we will add the new create a WG interface for our new WG Tunnel.
a. Navigate to `Interfaces -> Assignments`.
b. Scroll to the new interface row at the bottom of the list of existing assignments.
c. From the dropdown menu, select the new WireGuard interface, name it, and click the `+` button on the right to create it.

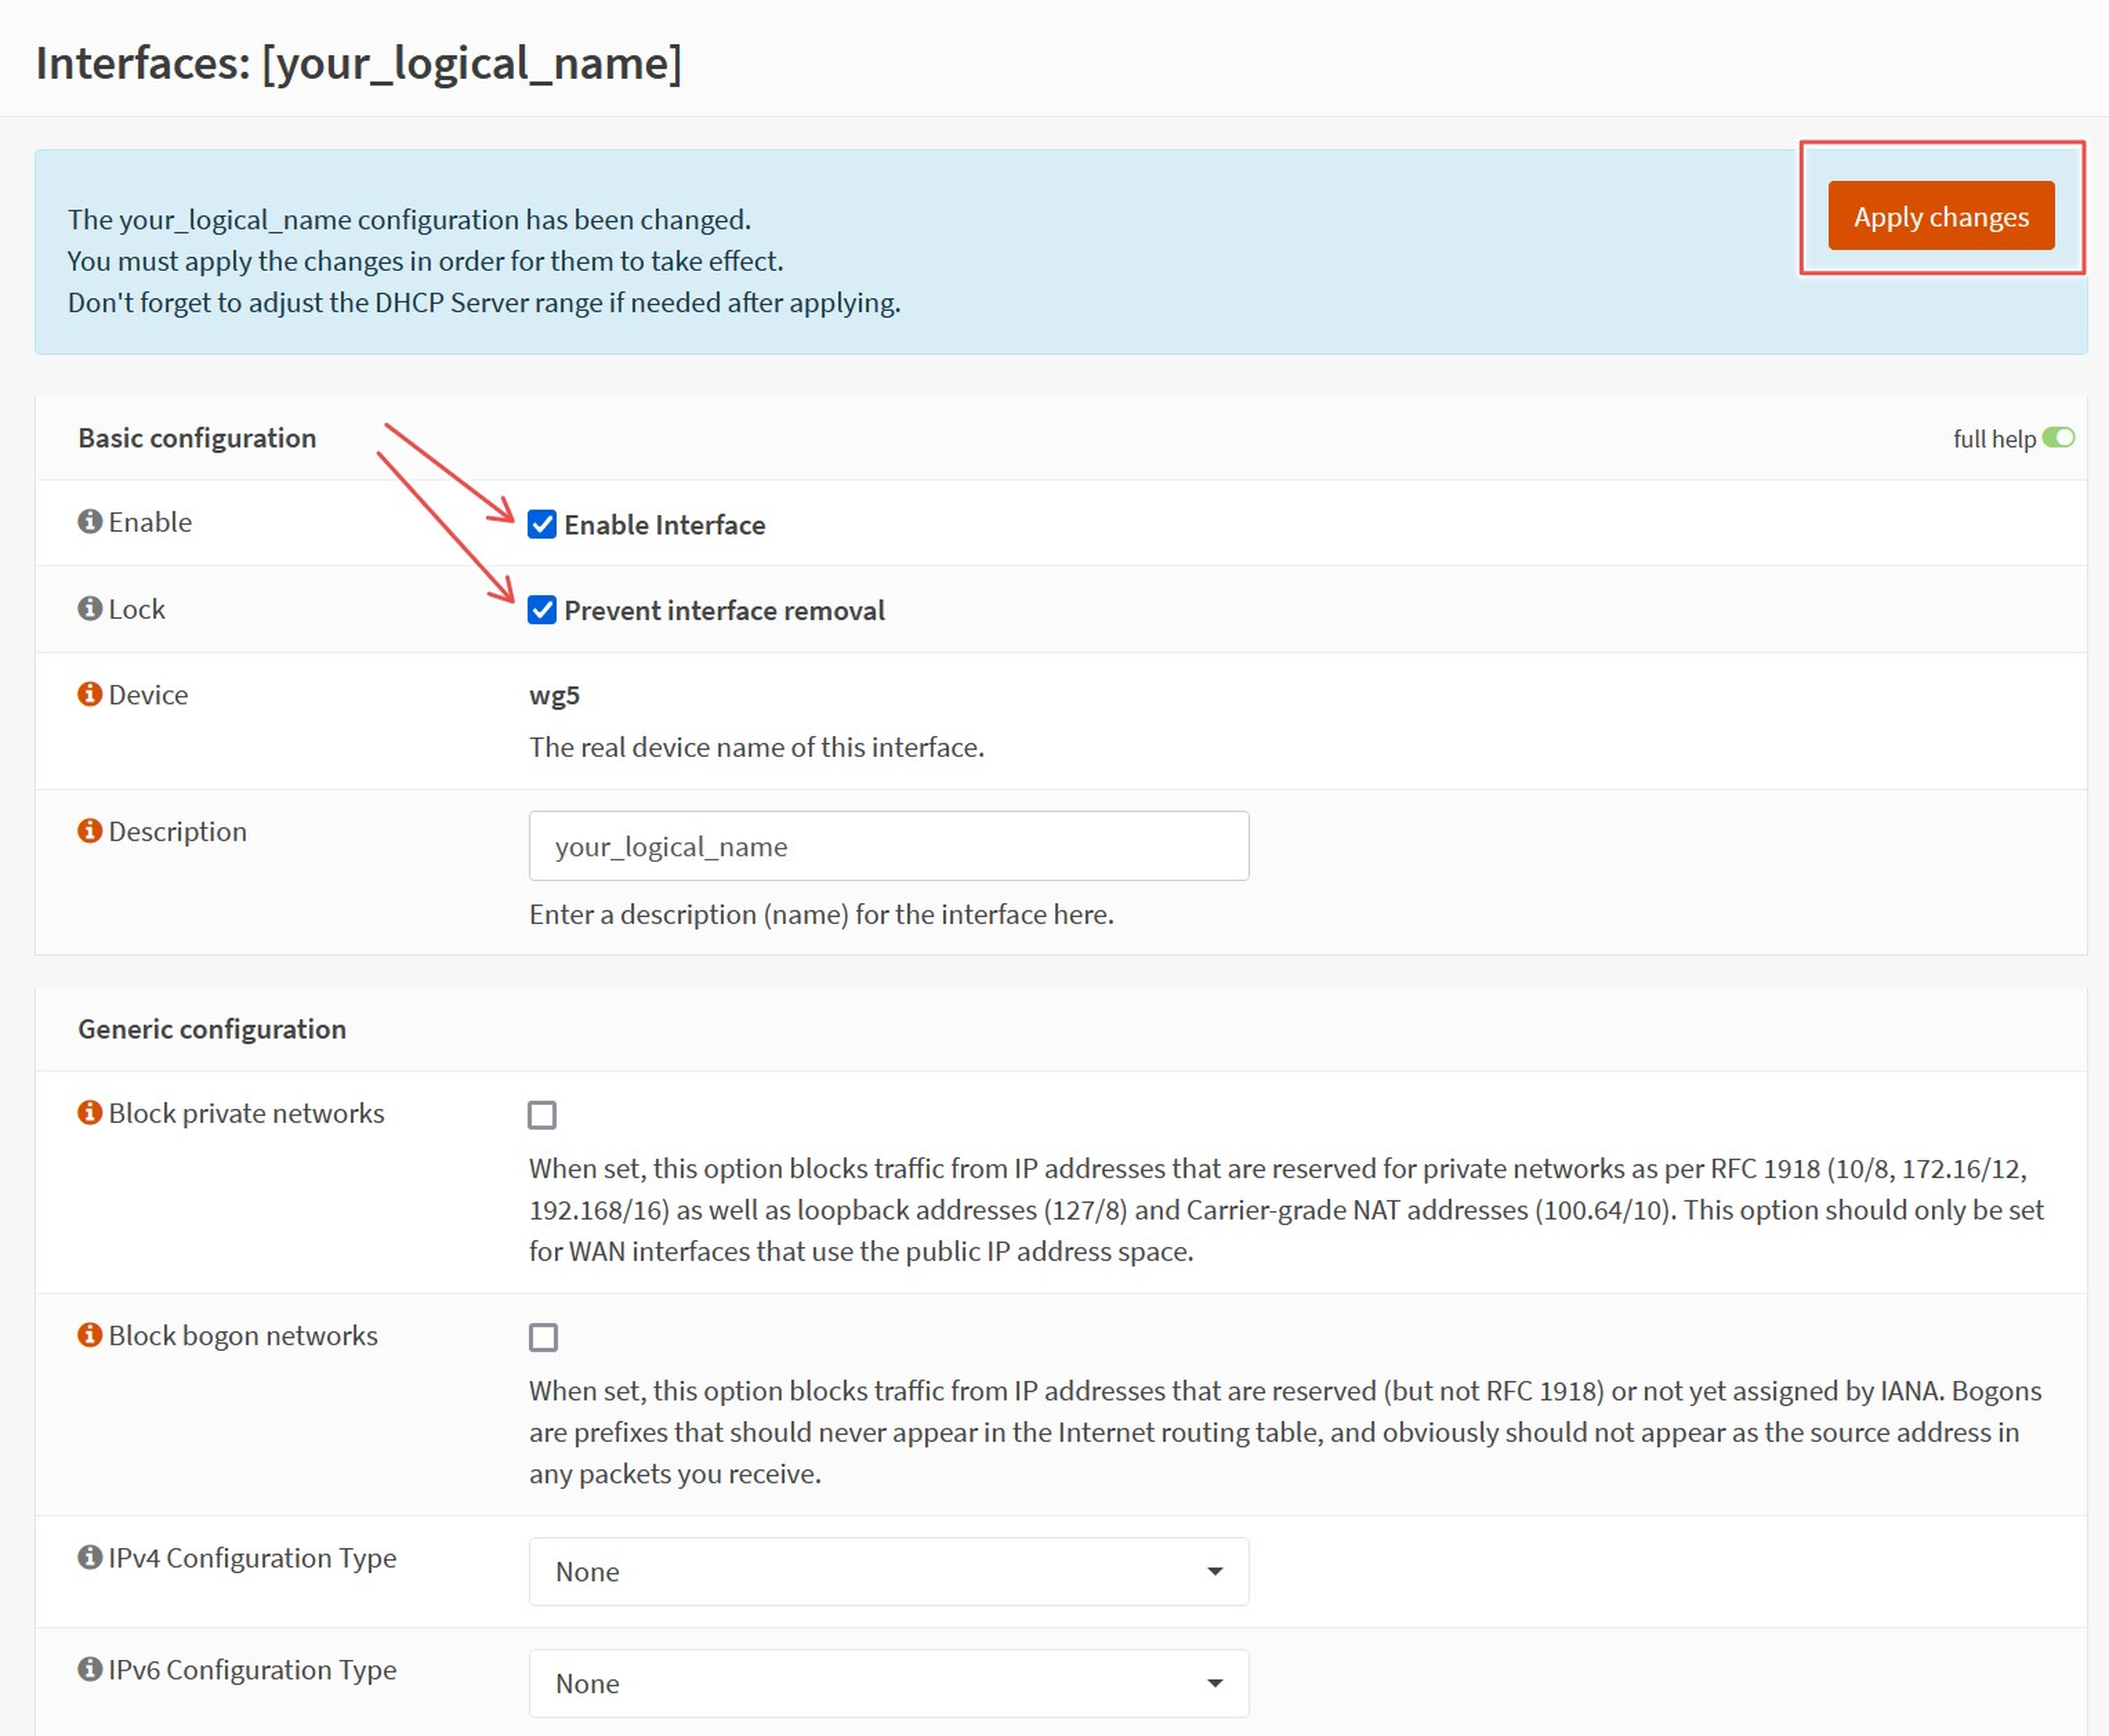
d. Enable the interface by selecting your new assignment within the list of interfaces and ticking `Enable Interface` and `Prevent interface removal`. Remember to `save` and `apply` any changes.
Configure the Firewall 'Aliases'
Creating aliases allows for less complex firewall rules. We will use these in the following steps.
a. Navigate to `Firewall -> Aliases`.
b. Click the `+` sign on the right to create a new alias.
c. Fill out the configuration window as follows.
| Option | Value |
|---|---|
| Enabled | `Yes` |
| Name | `PRIVATE_LAN` |
| Type | `Network(s)` |
| Content | `10.70.70.0/24` `192.168.1.0/24` <- our WG and LAN address ranges |
d. `Save`.
e. Create a second Alias.
This alias covers all the addressable private IP ranges. We will use this alias later to allow WAN access via an invert function.
| Option | Value |
|---|---|
| Enabled | `Yes` |
| Name | `RFC1918_Networks` |
| Type | `Network(s)` |
| Content | `10.0.0.0/8` `172.16.0.0/12` `192.168.0.0/16` |
f. `Save`.
g. `Apply` the configuration.
Configure the firewall 'WAN'
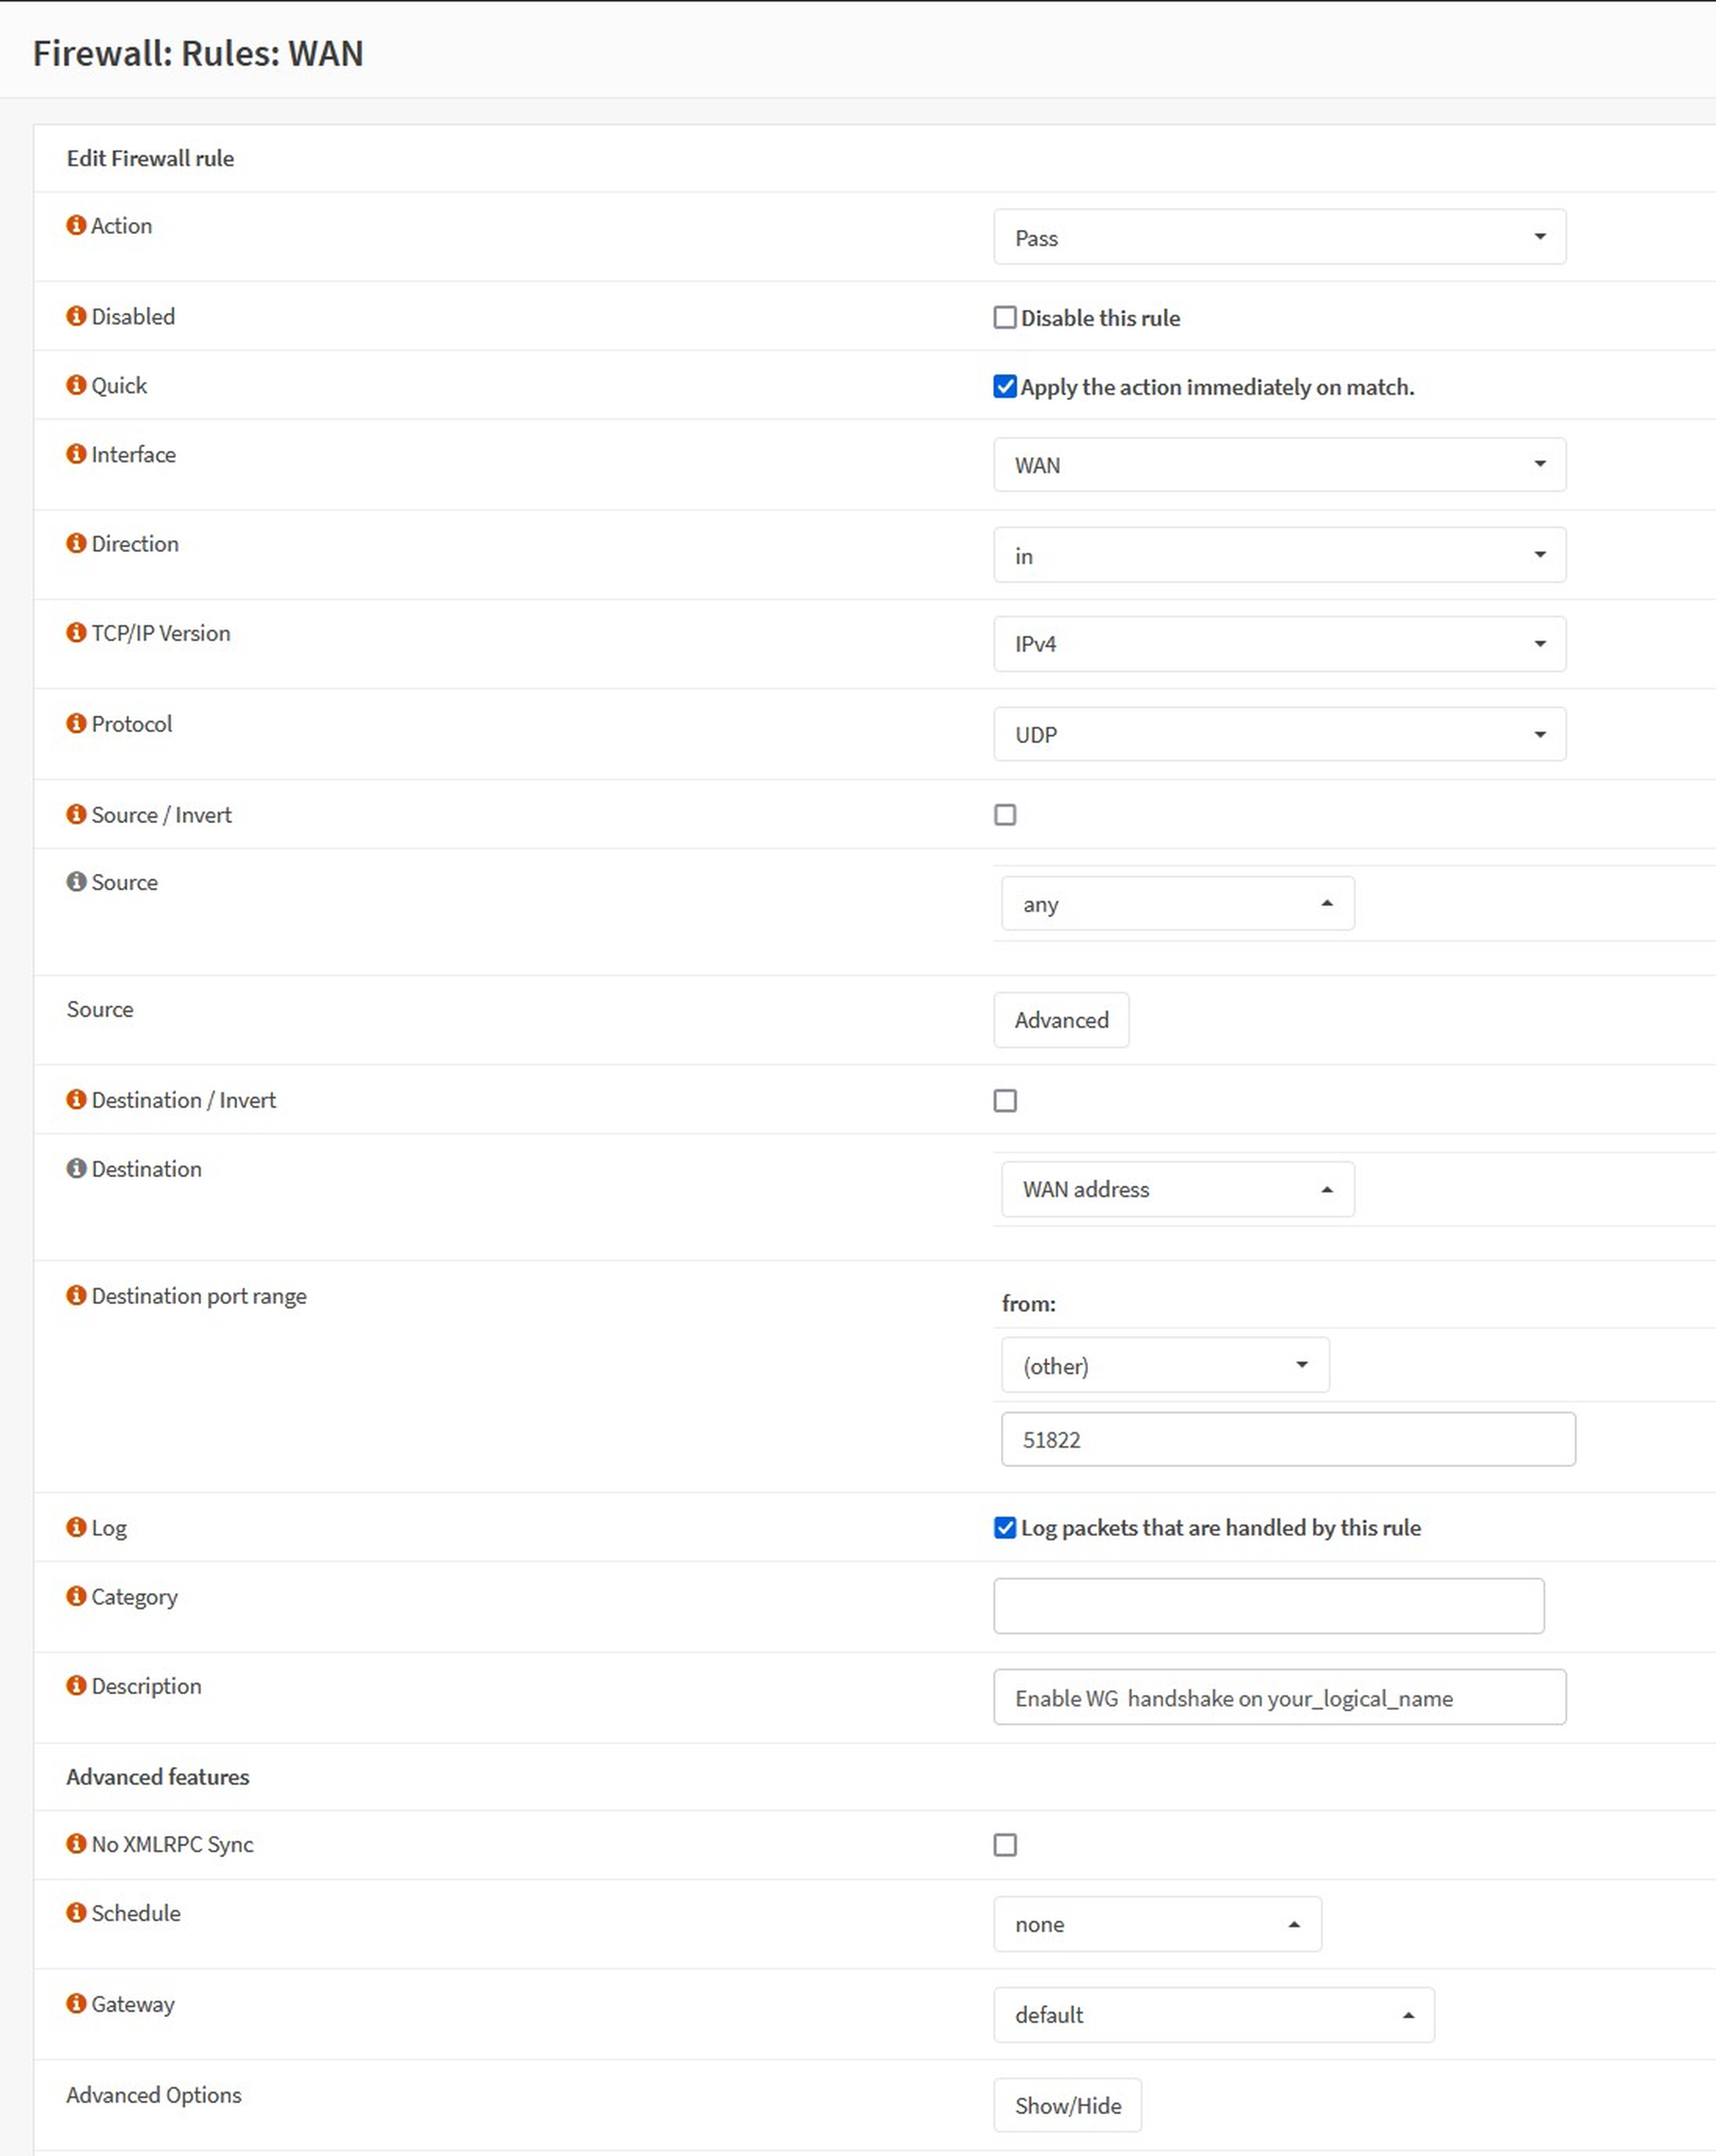
This rule opens a port and allows the WG handshake to take place.
a. Navigate to `Firewall -> Rules -> WAN`.
b. Open the listening port to allow WireGuard to make a connection. This is the port that we selected in Step 2b. (e.g., 51822).
c. At the top right, click the `+` sign to create a new rule.
d. In the Configuration window, set the following values.
| Option | Value |
|---|---|
| Action | `Pass` |
| Quick | `Check` |
| Interface | `WAN` |
| Protocol | `UDP` |
| Destination | `WAN Address` |
| Destination Port Range | `51822 to 51822` |
| LOG | `Check` <- optional |
| Description | `Enable WG handshake on your_logical_name` |
| Everything else | `Leave Default` |
e. `Save` and exit.
f. `Apply` the configuration.
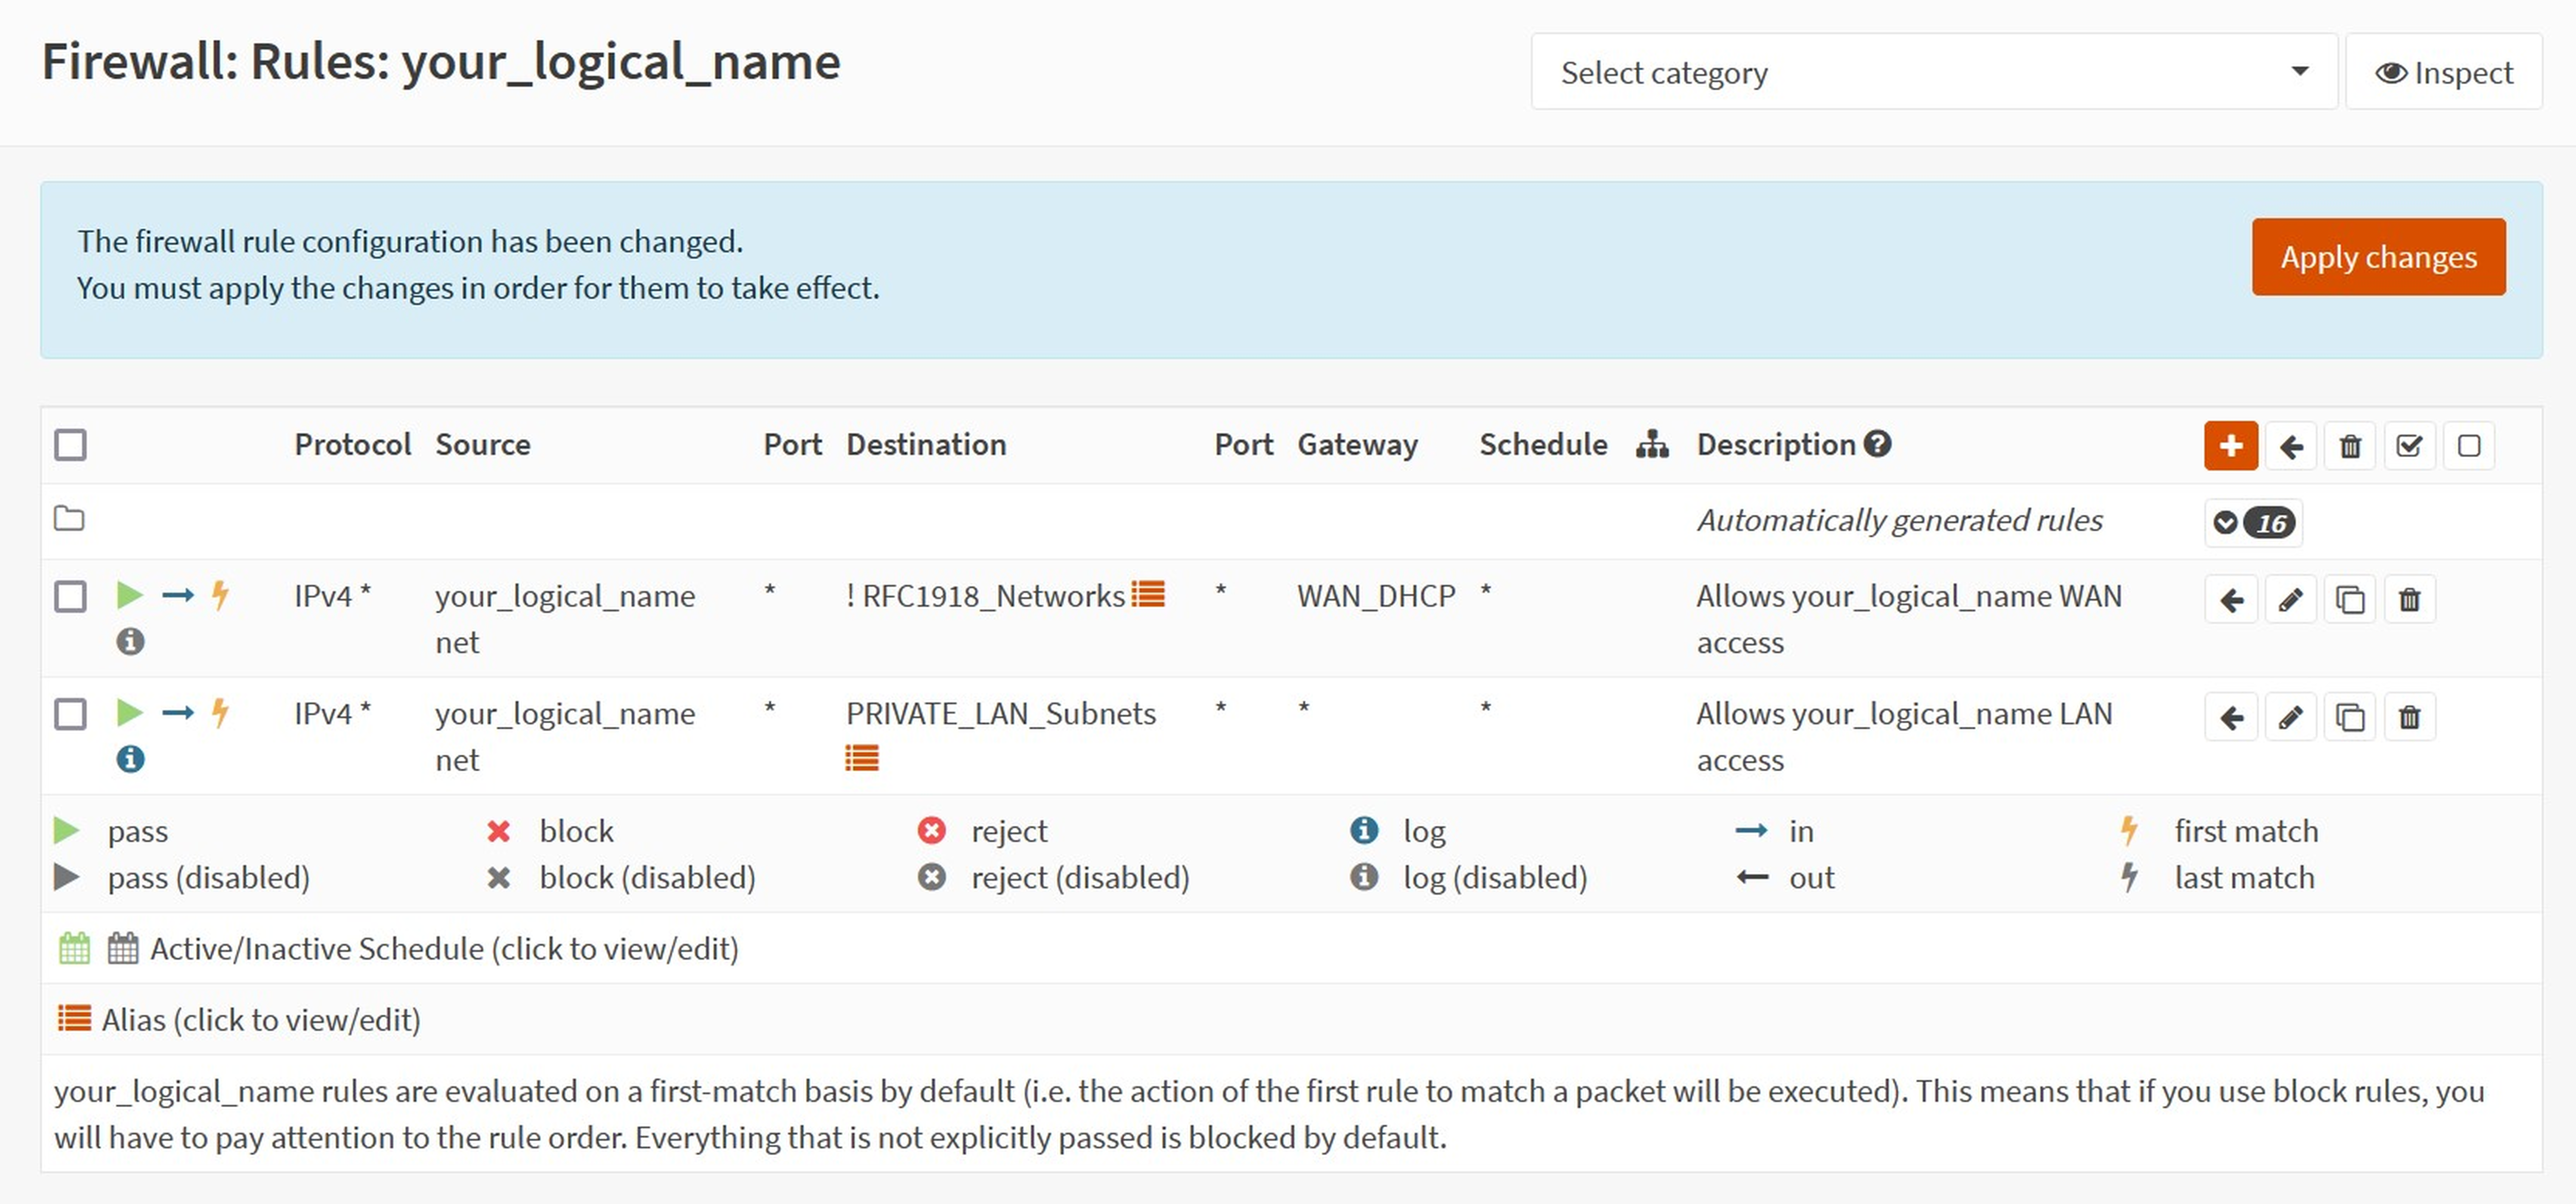
Configure the firewall 'your_logical_name'
This rule allows the WG traffic to access our LAN network – note the use of our Alias created earlier.
a. Define WG peer access to your network by creating a new rule.
b. Navigate to `Firewall -> rules -> your_logical_name`.
c. Create the following two rules.
| Option | Value |
|---|---|
| Action | `Pass` |
| Quick | `Check` |
| Interface | `your_logical_name` |
| Source | `your_logical_name net` |
| Destination | `PRIVATE_LAN` |
| Description | `Allows your_logical_name LAN access` |
| Everything else | `Leave Default` |
If we wanted to restrict peer access to our only WG subnet, we would omit this rule. In this case you may want to make a rule allowing access to the firewall for DNS etc.
Allow the WG peer WAN access by defining the gateway for publicly addressed traffic.
| Option | Value |
|---|---|
| Action | `Pass` |
| Quick | `Check` |
| Interface | `your_logical_name` |
| Source | `your_logical_name net` |
| Destination / Invert | `Check` |
| Destination | `RFC1918_Networks` |
| Description | `Allows your_logical_name WAN access` |
| Everything else | `Leave Default` |
f. `Apply`.
Part B: Making the Connection
Get the Mobile App for your device
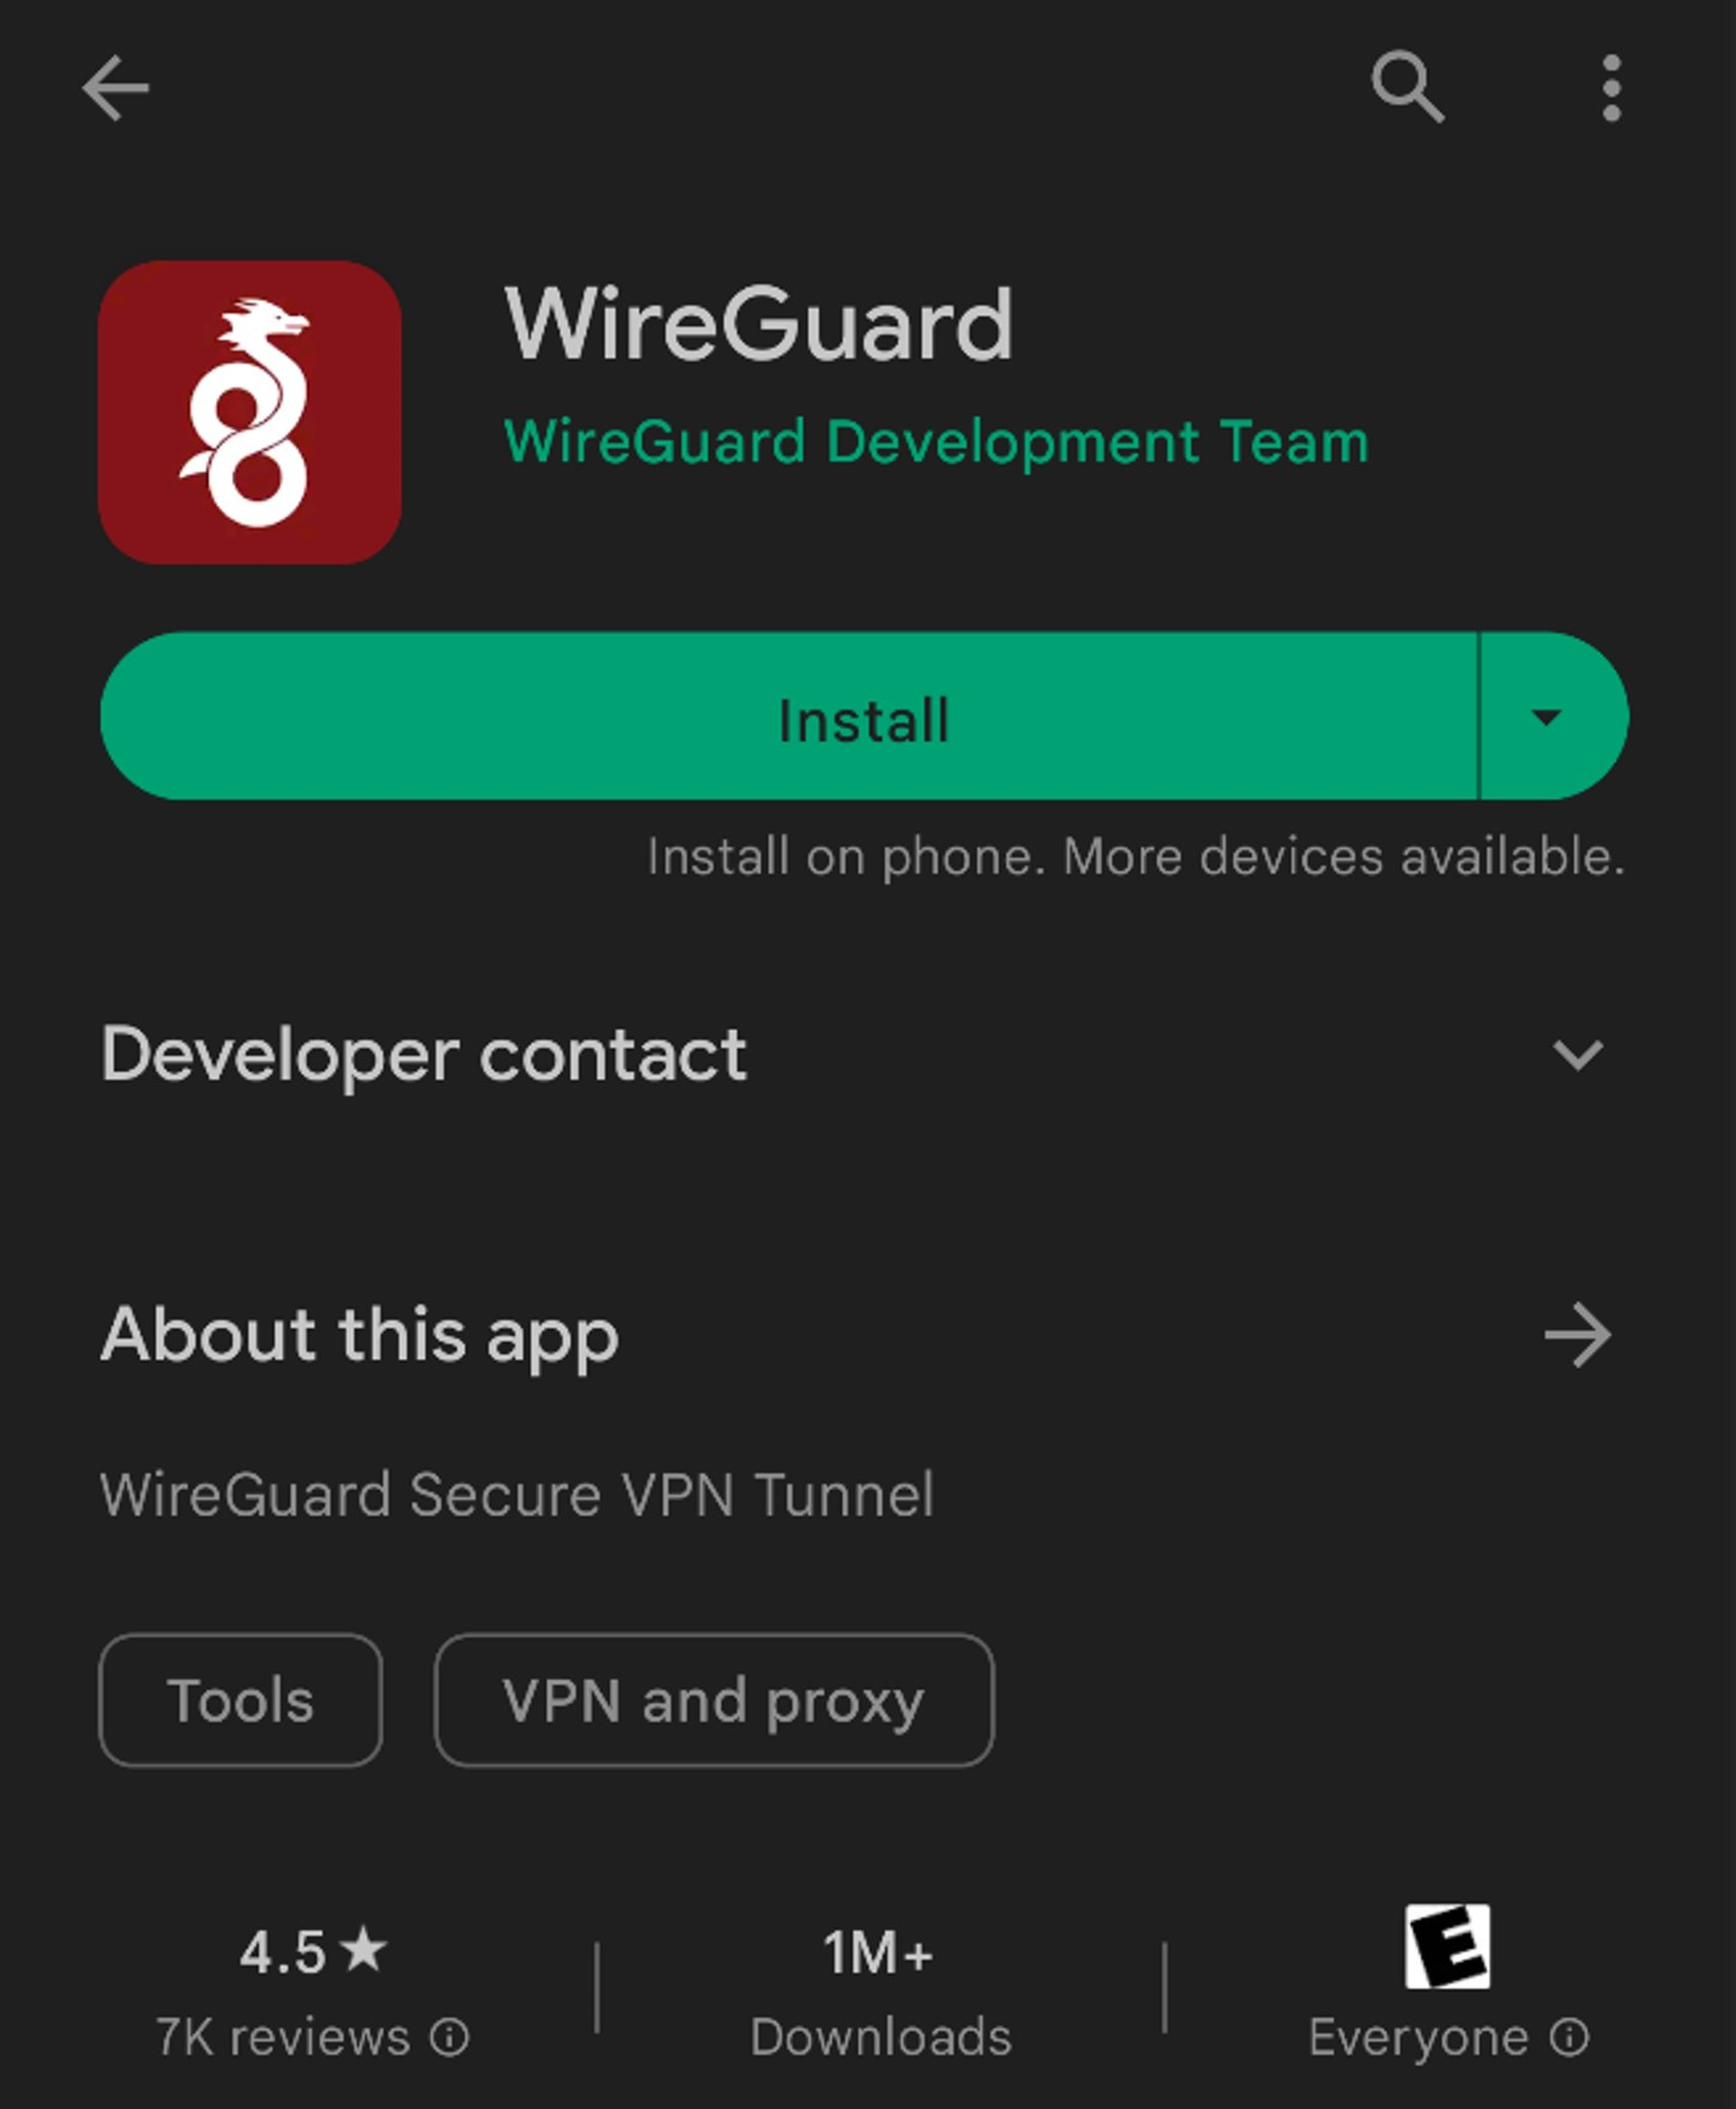
1. Download the official WireGuard app from your relevant Appstore. For this guide, we will be using Google Play on Android. Listed as “WireGuard” on all App stores.
Set up the Interface 'Mobile App'
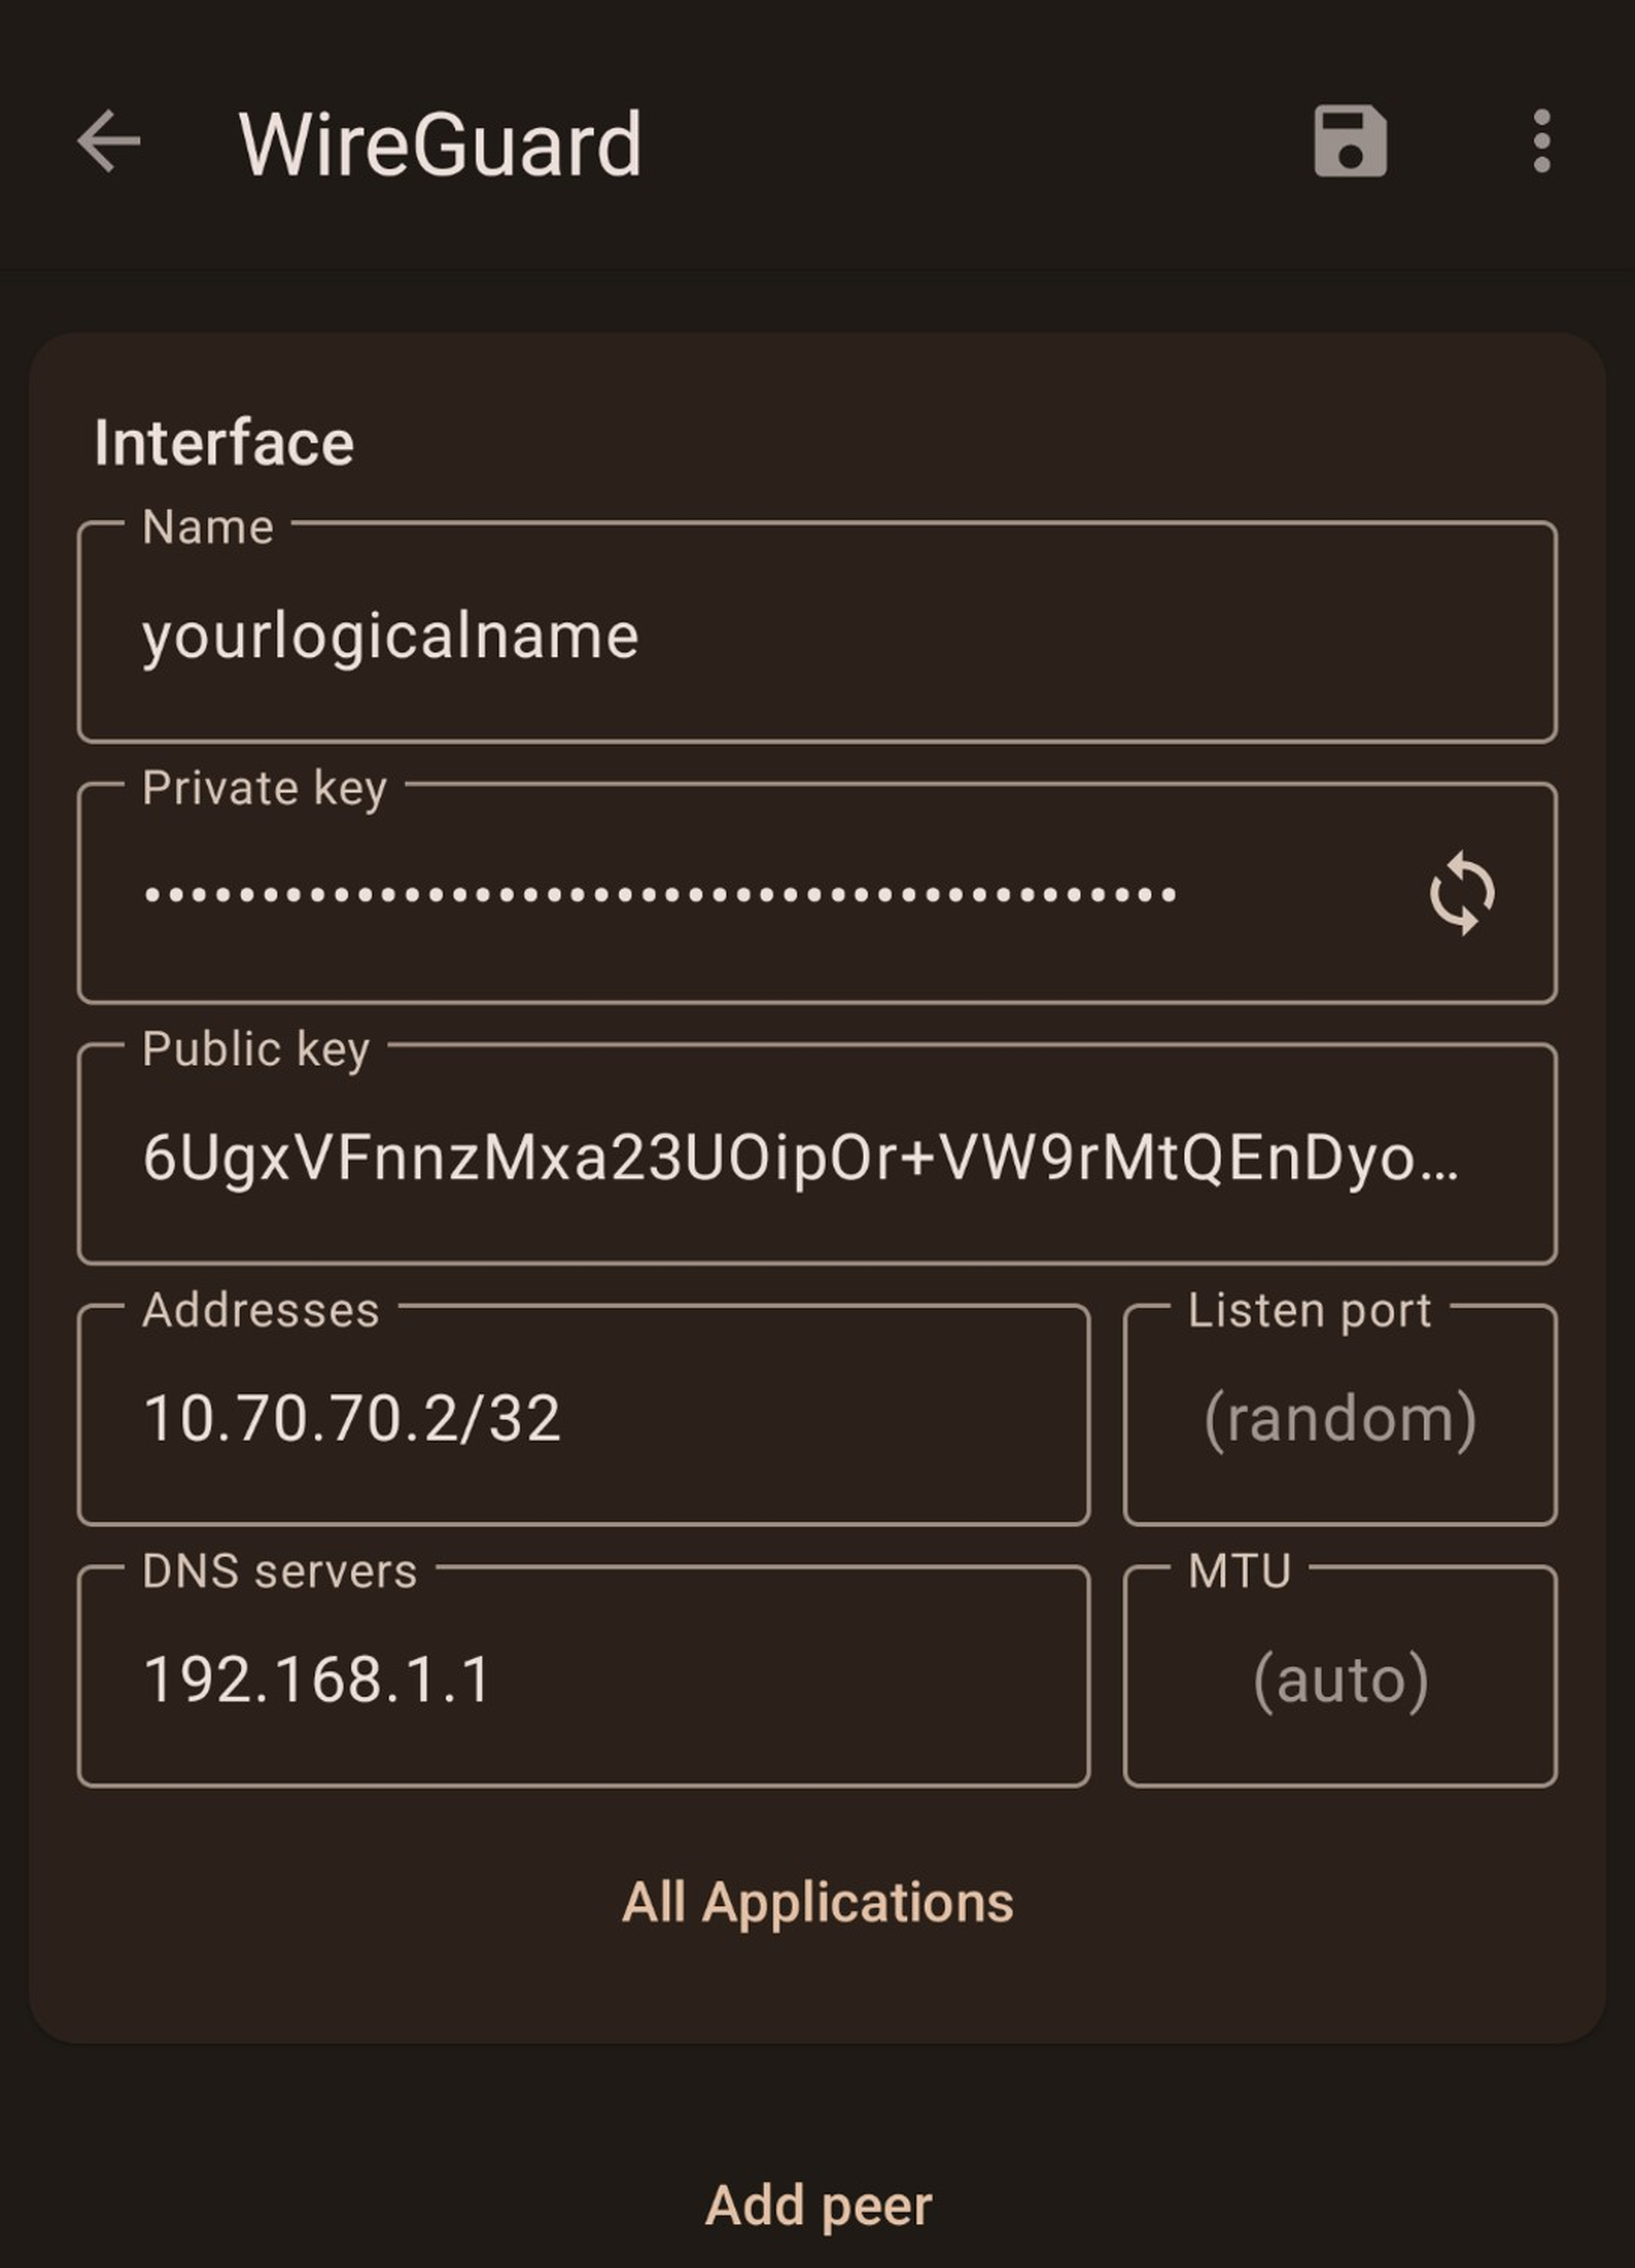
1. Tap the `+` and opt for `Create from scratch`.
2. Set up the interface as flows.
| Option | Value |
|---|---|
| Name | `yourlogicalname` |
| Keys | In the private key field, tap the refresh button to generate a set of public and private keys |
| Addresses | `10.70.70.2/32` |
| DNS Servers | `192.168.1.1` <- the gateway of your LAN network is the default location for the OPNsense DNS server to run. |
3. `Save`.
Set up the Peer 'Mobile App'
1. Below the interface section, select `Add peer.`
2. Find the Public Key for the OPNsense peer. In this case, we can return to `VPN -> WireGuard -> local` and edit the interface to view the public key.
Do not share any peer's private key. This would undermine tunnel security. Public keys, however, are intended to be public.
| Option | Value |
|---|---|
| Public Key | `Bl3cPkVDmcvmdE/IrpFPpxR6mZ1Ndc0EqCElErPbM1U=` <- our OPNsense public key |
| Allowed IPs | 0.0.0.0/0 <-this IP range tells the app to route traffic all traffic through the tunnel. |
| Endpoint | `yourdomain.com:51822` <- Domain with DDNS setup followed by the UDP port the OPNsense WG peer is listening on. |
5. `Save` the tunnel.
Set up the Peer 'Router'
1. On the OPNsense router, navigate to `VPN -> WireGuard -> Endpoints` to add the mobile phone as a peer.
2. Click the `+` icon at the bottom left and enter the following.
| Option | Value |
|---|---|
| Name | `yourlogicalname_peer` |
| Public Key | `6UgxVFnnzMxa23UOipOr+VW9rMtQEnDyoYKC+4ZEKWg=` <- Our Mobile peer Public Key |
| Allowed IPs | `10.70.70.2/32` <- This is the IP set in the interface section of the mobile app |
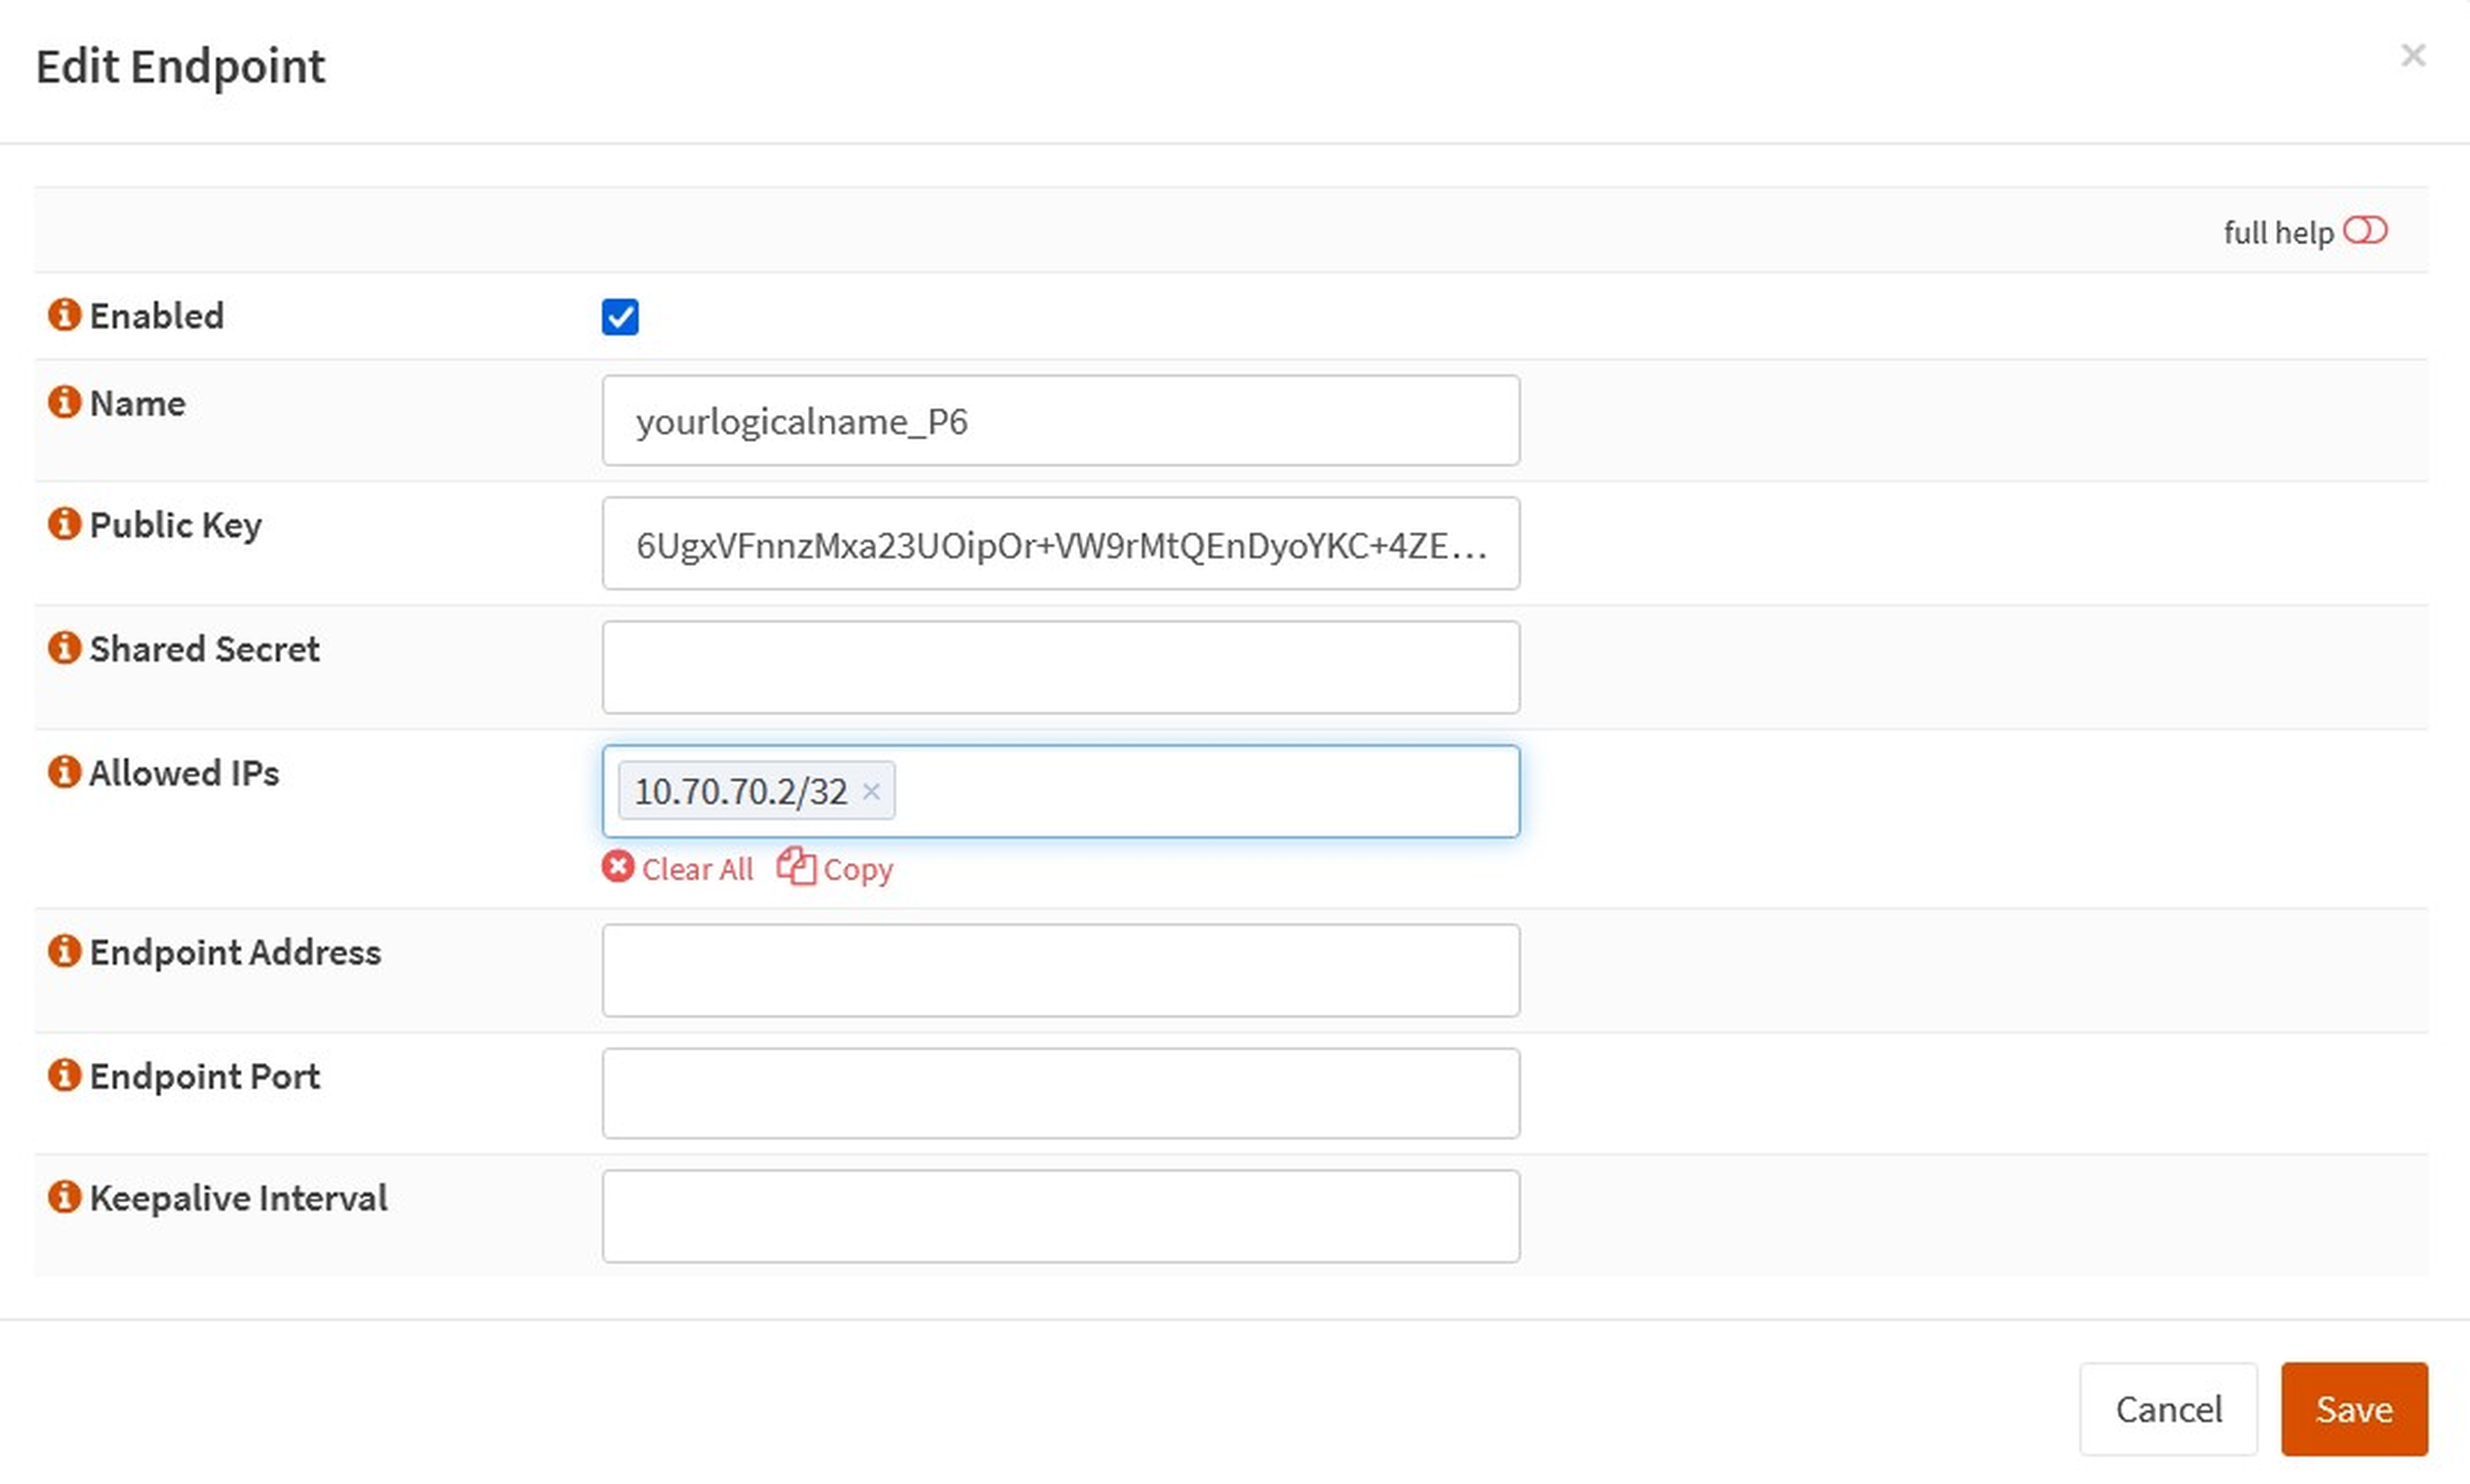
A suitable peer naming format is to start with the tunnel description and then the device identifier – this keeps the drop-down lists tidy.
3. Return to the `Local` tab within OPNsense WireGuard settings.
4. Edit the WireGuard tunnel and add the newly created endpoint as a peer.
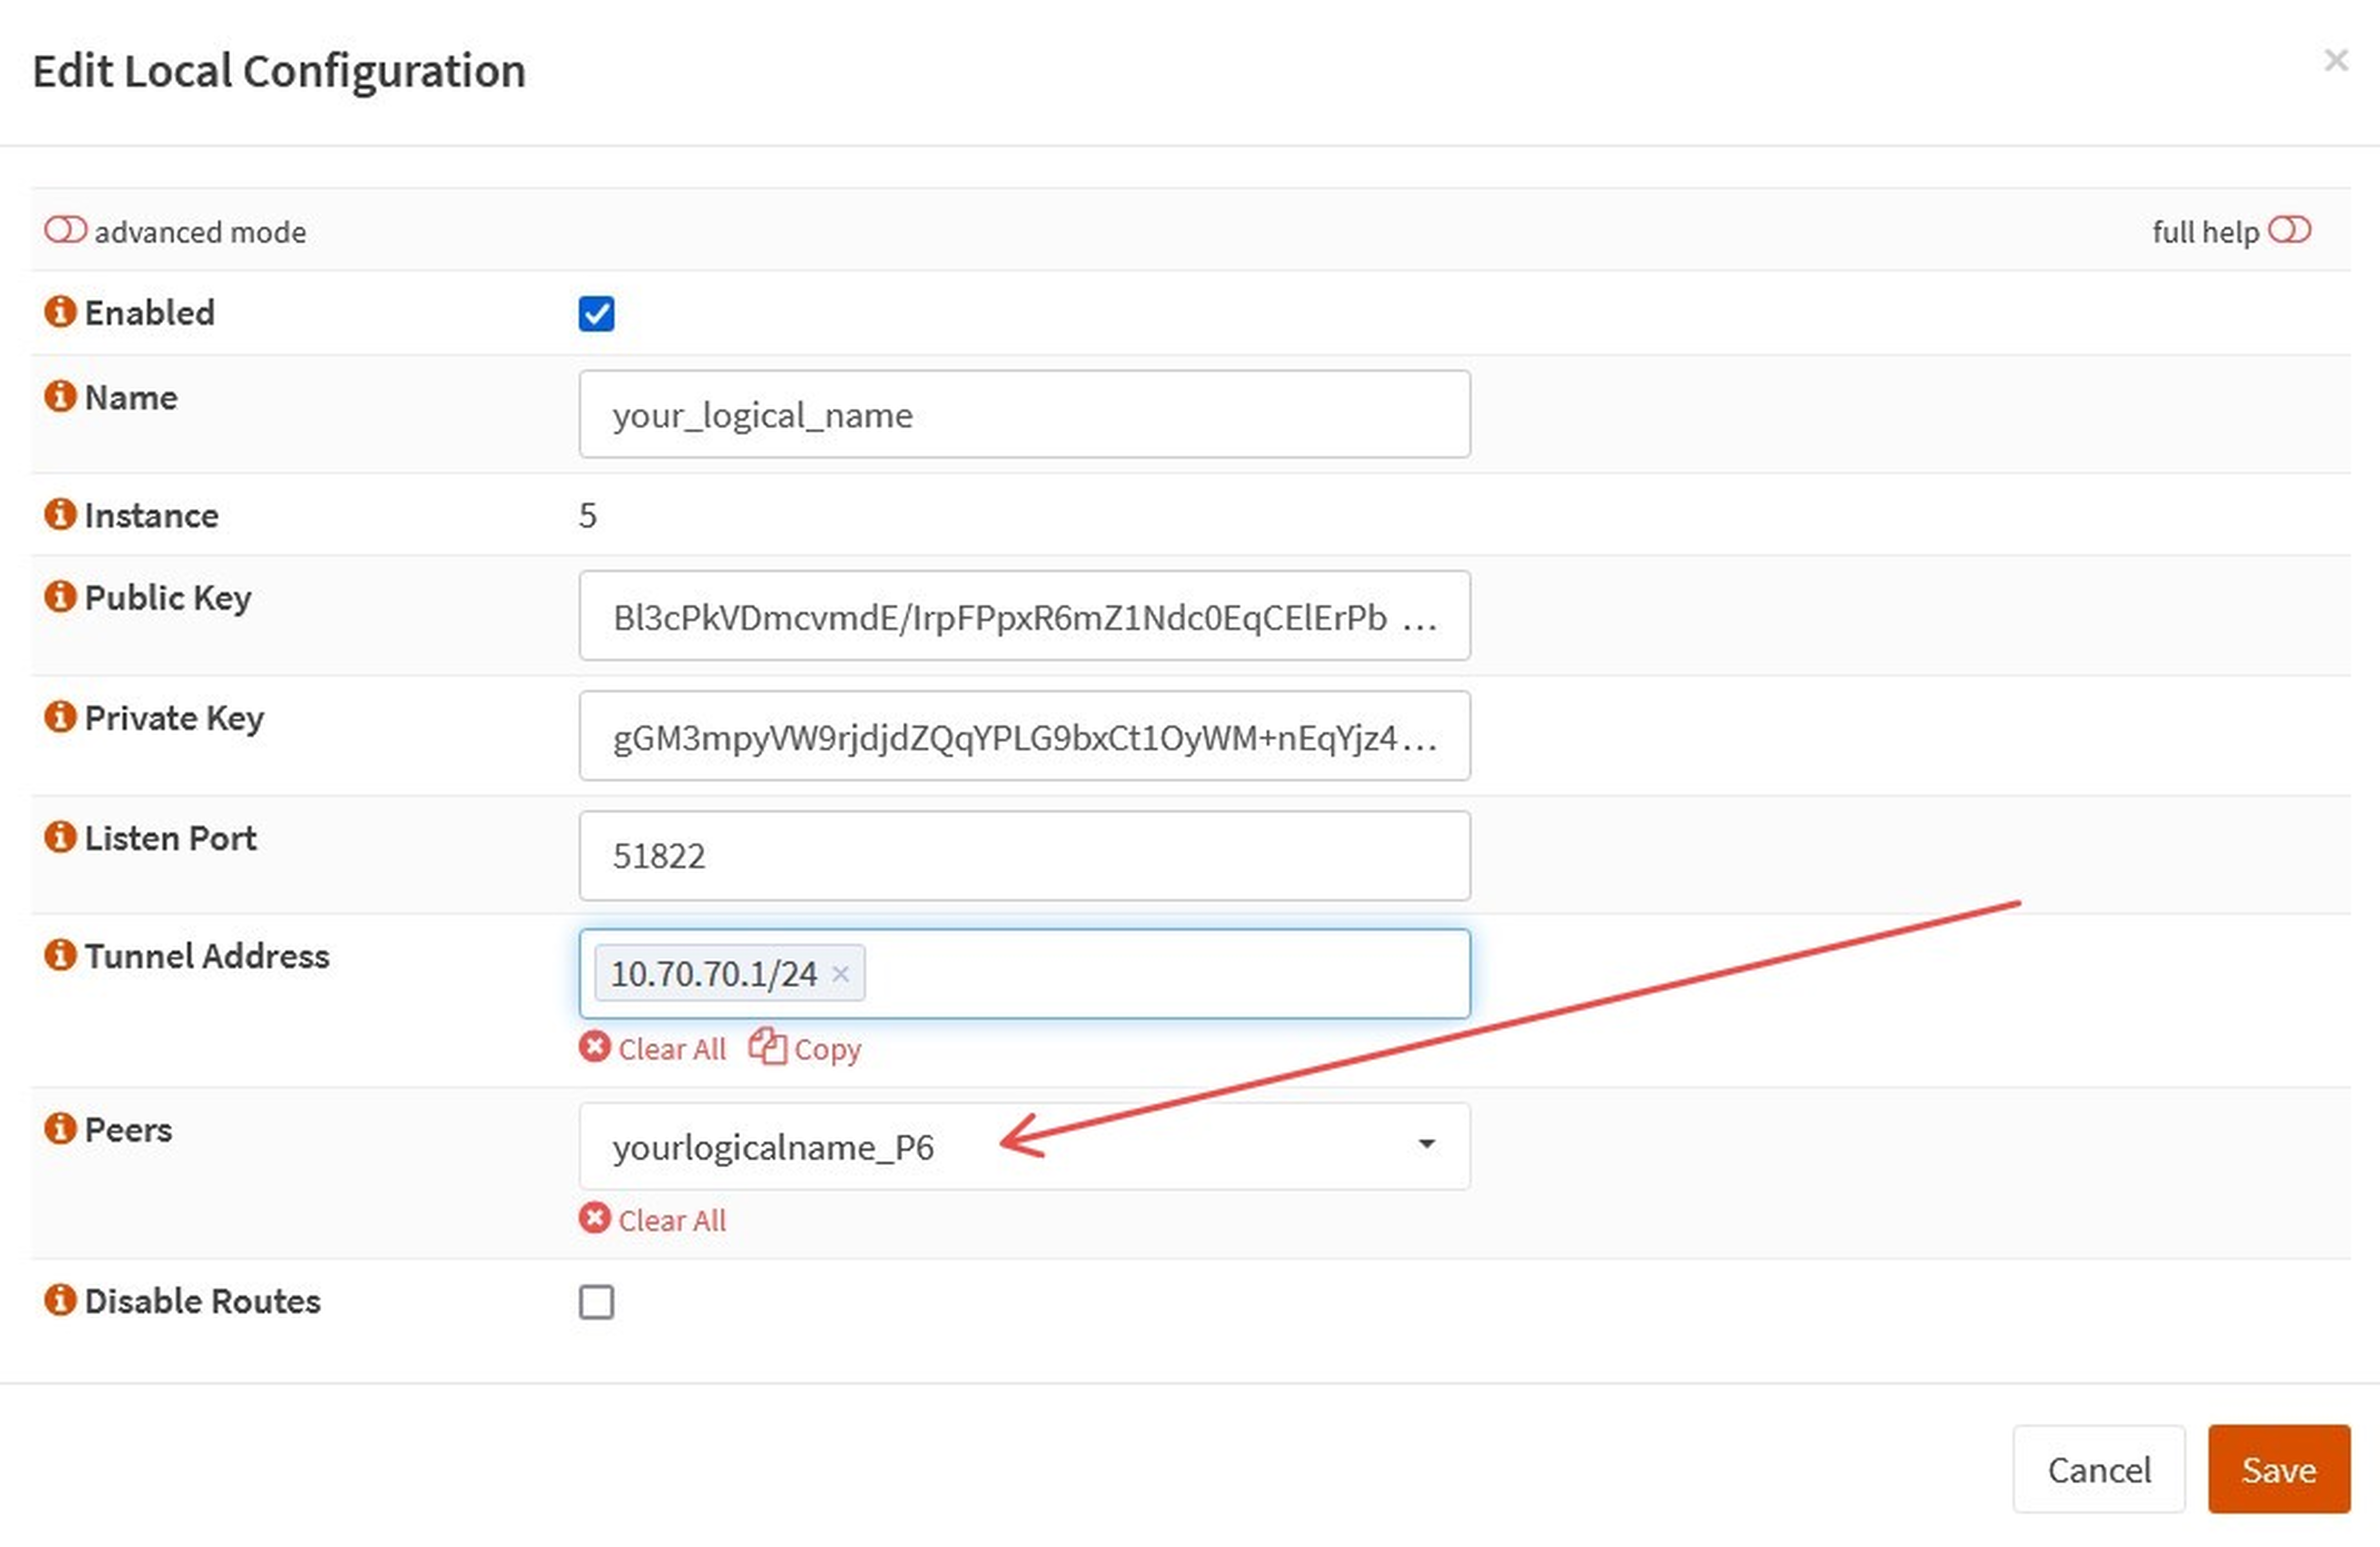
3. `Save`.
4. `Apply ` <- Seriously, don't forget this step!
Start the tunnel
1. On OPNsense: To enable the tunnel, check 'Enable WireGuard' under the general tab for both Local and Endpoint configurations.
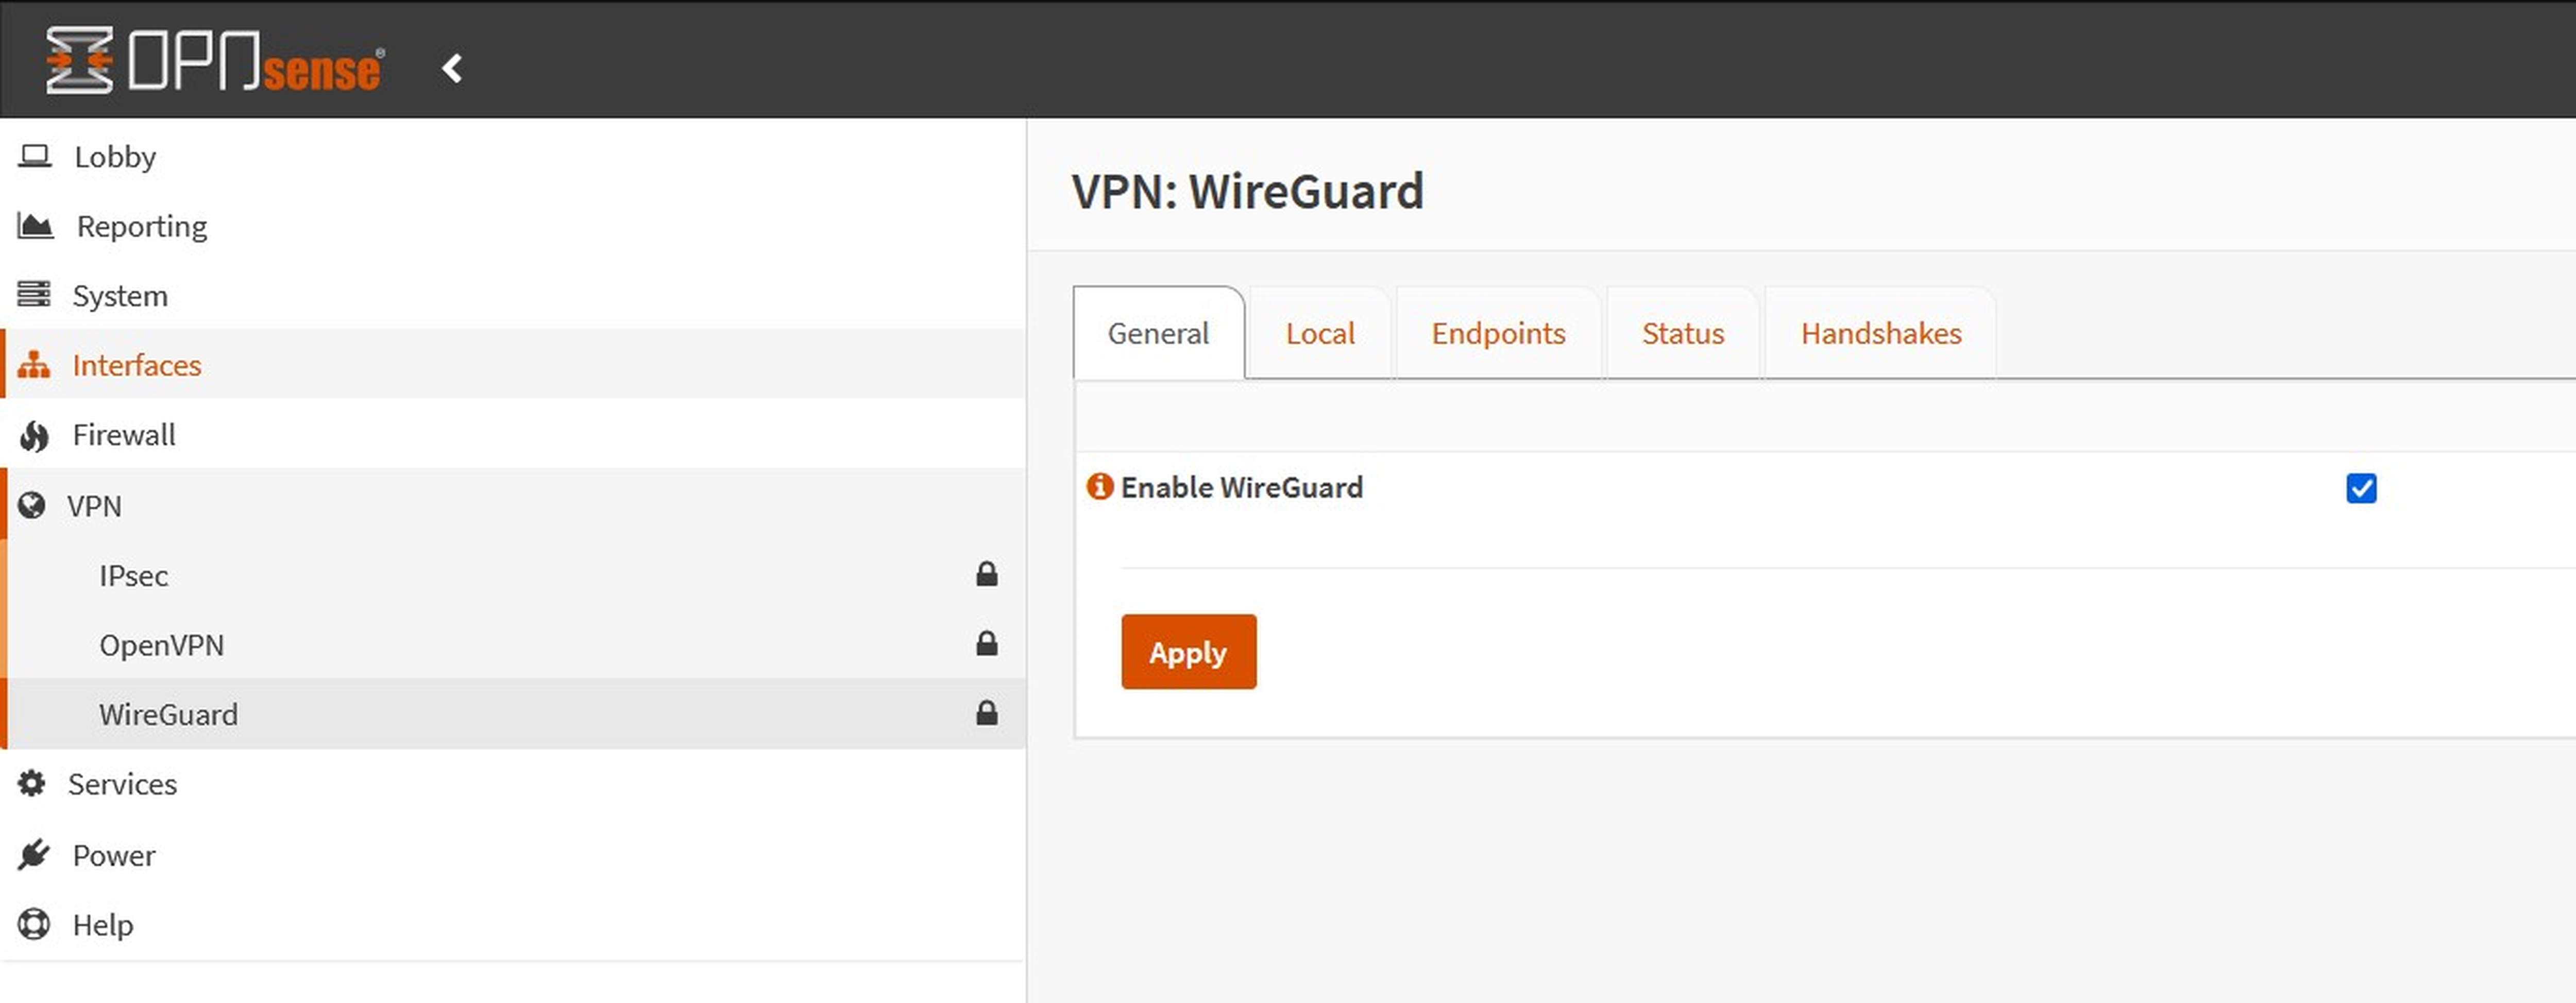
2. `Apply`.
3. On Mobile Phone: In the overview, tap the slider to enable the selected WireGuard tunnel.
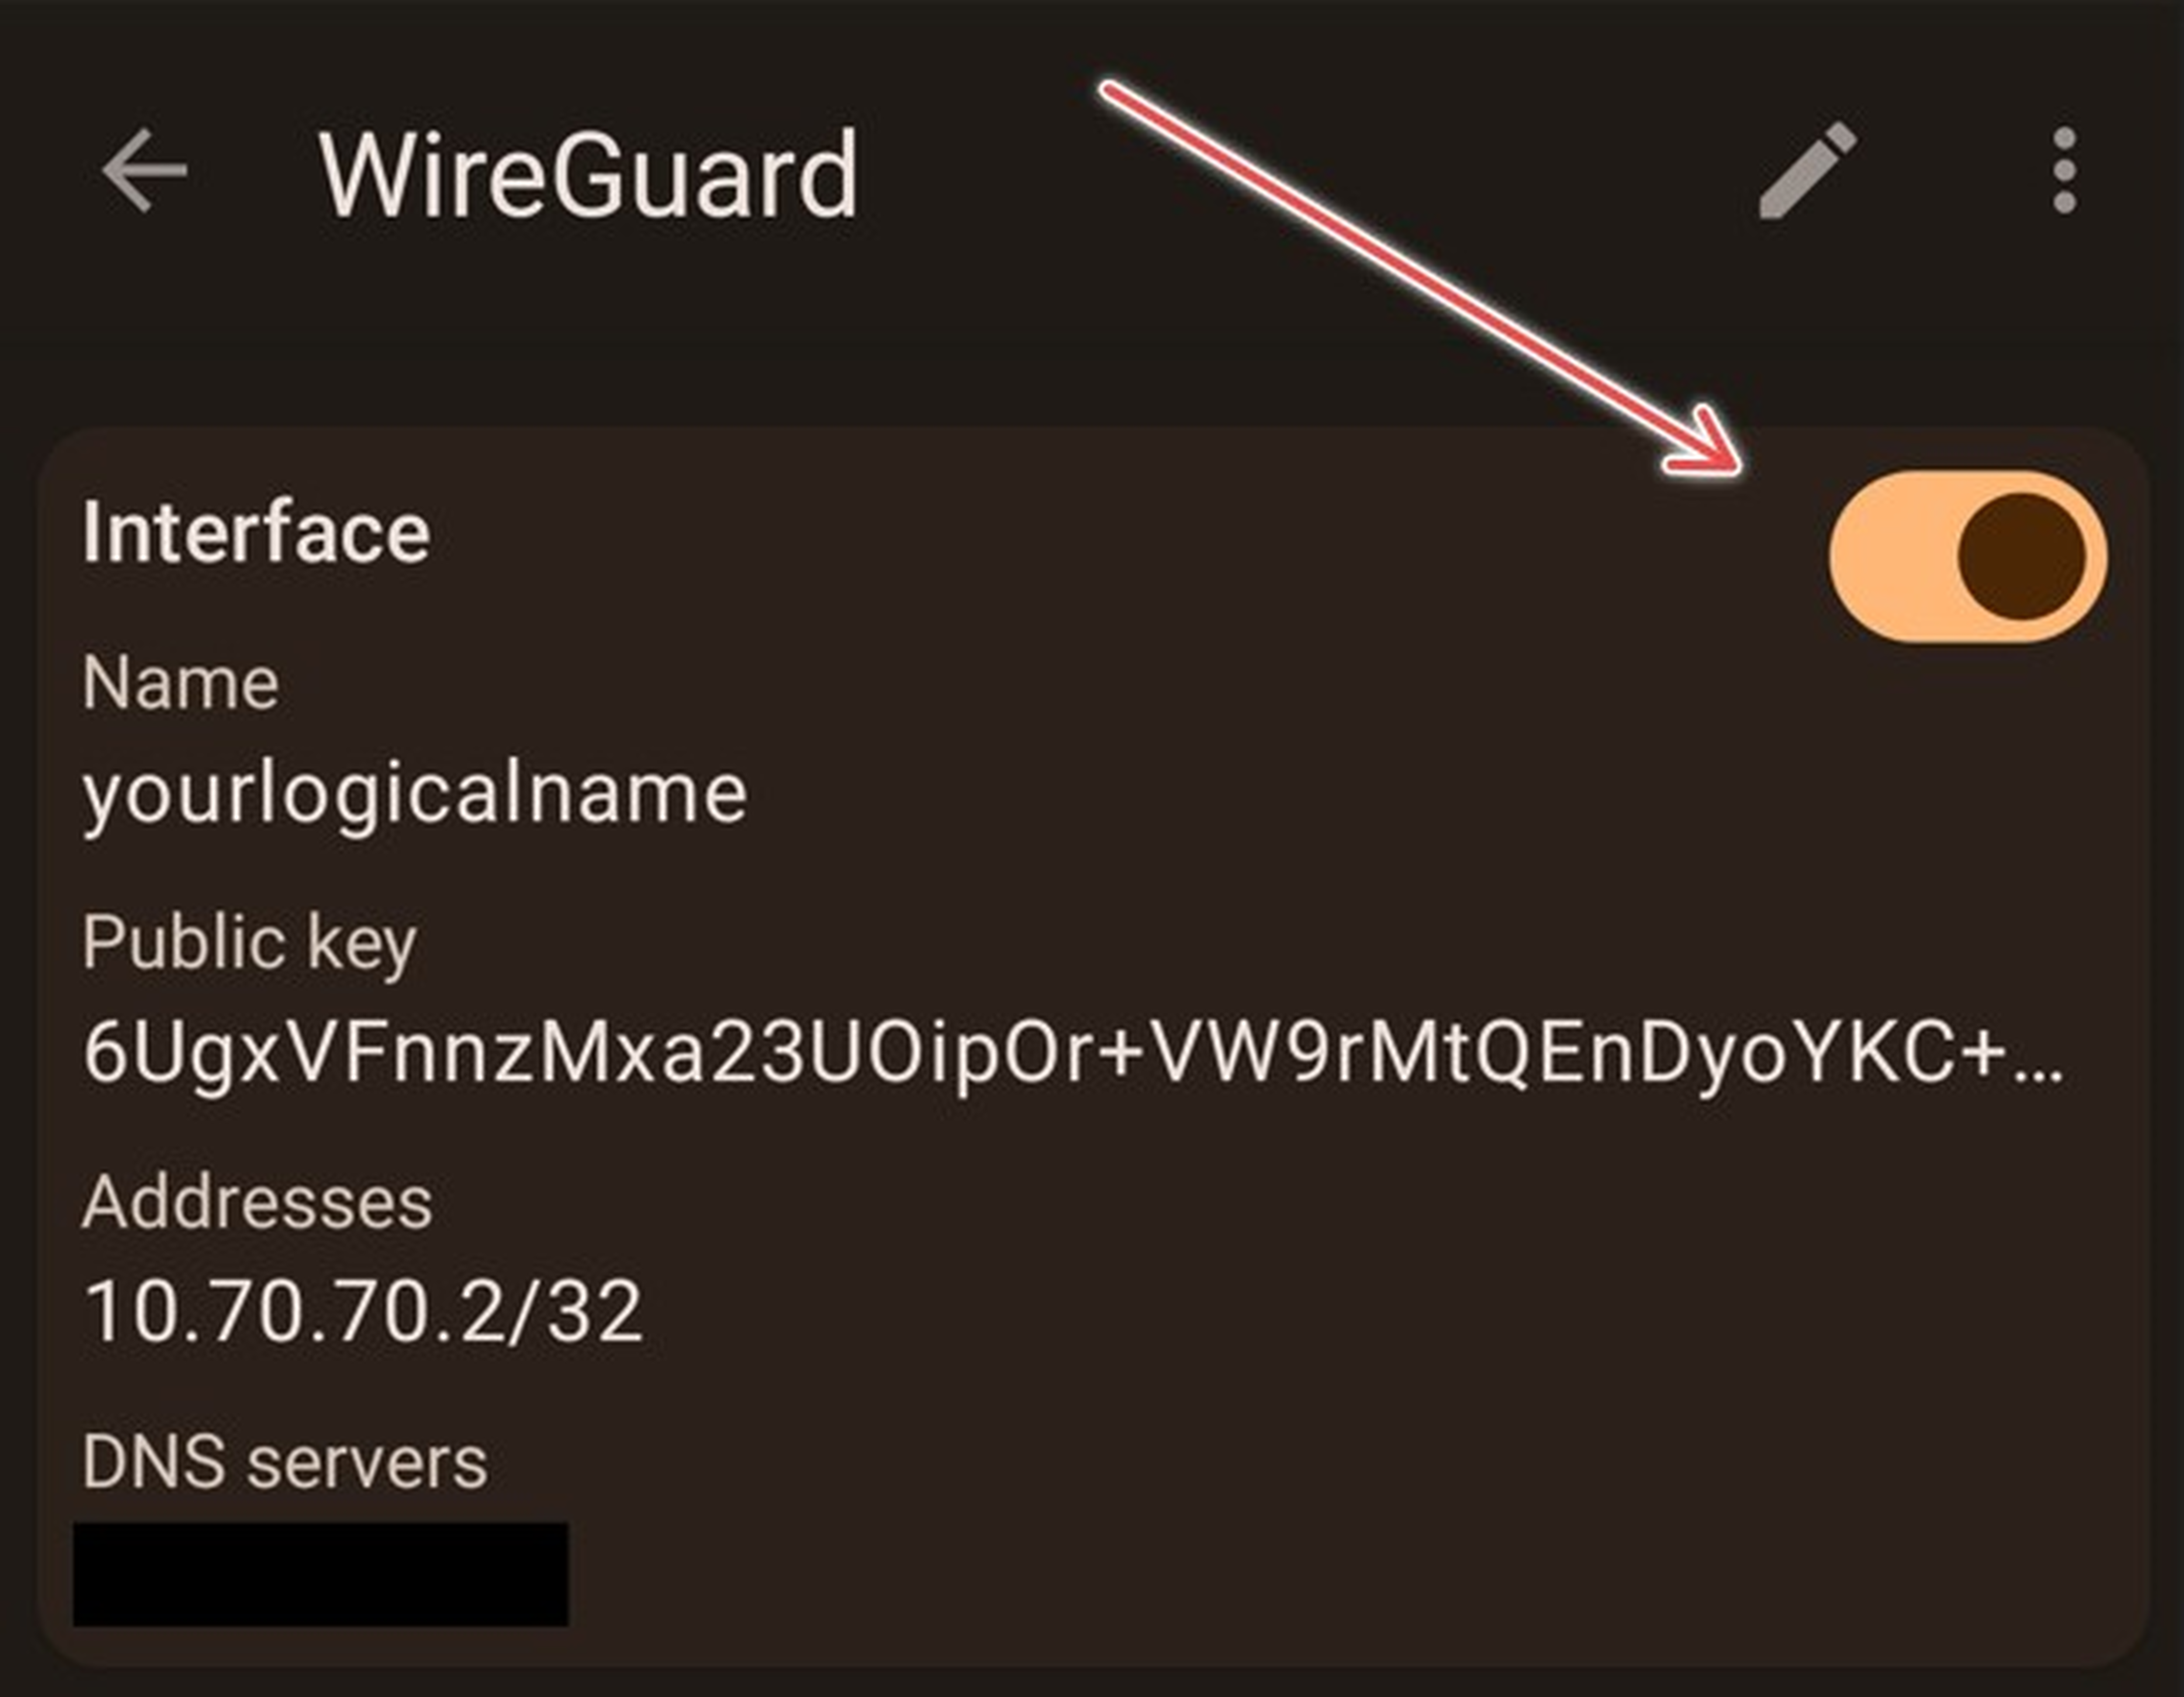
Check for connection
1. A handshake indicates a successful network connection. 'TX' signifies data sent, while 'RX' indicates received data, confirming a successful connection.
2. Check the status of the connection under the WireGuard ‘Status’ tab.
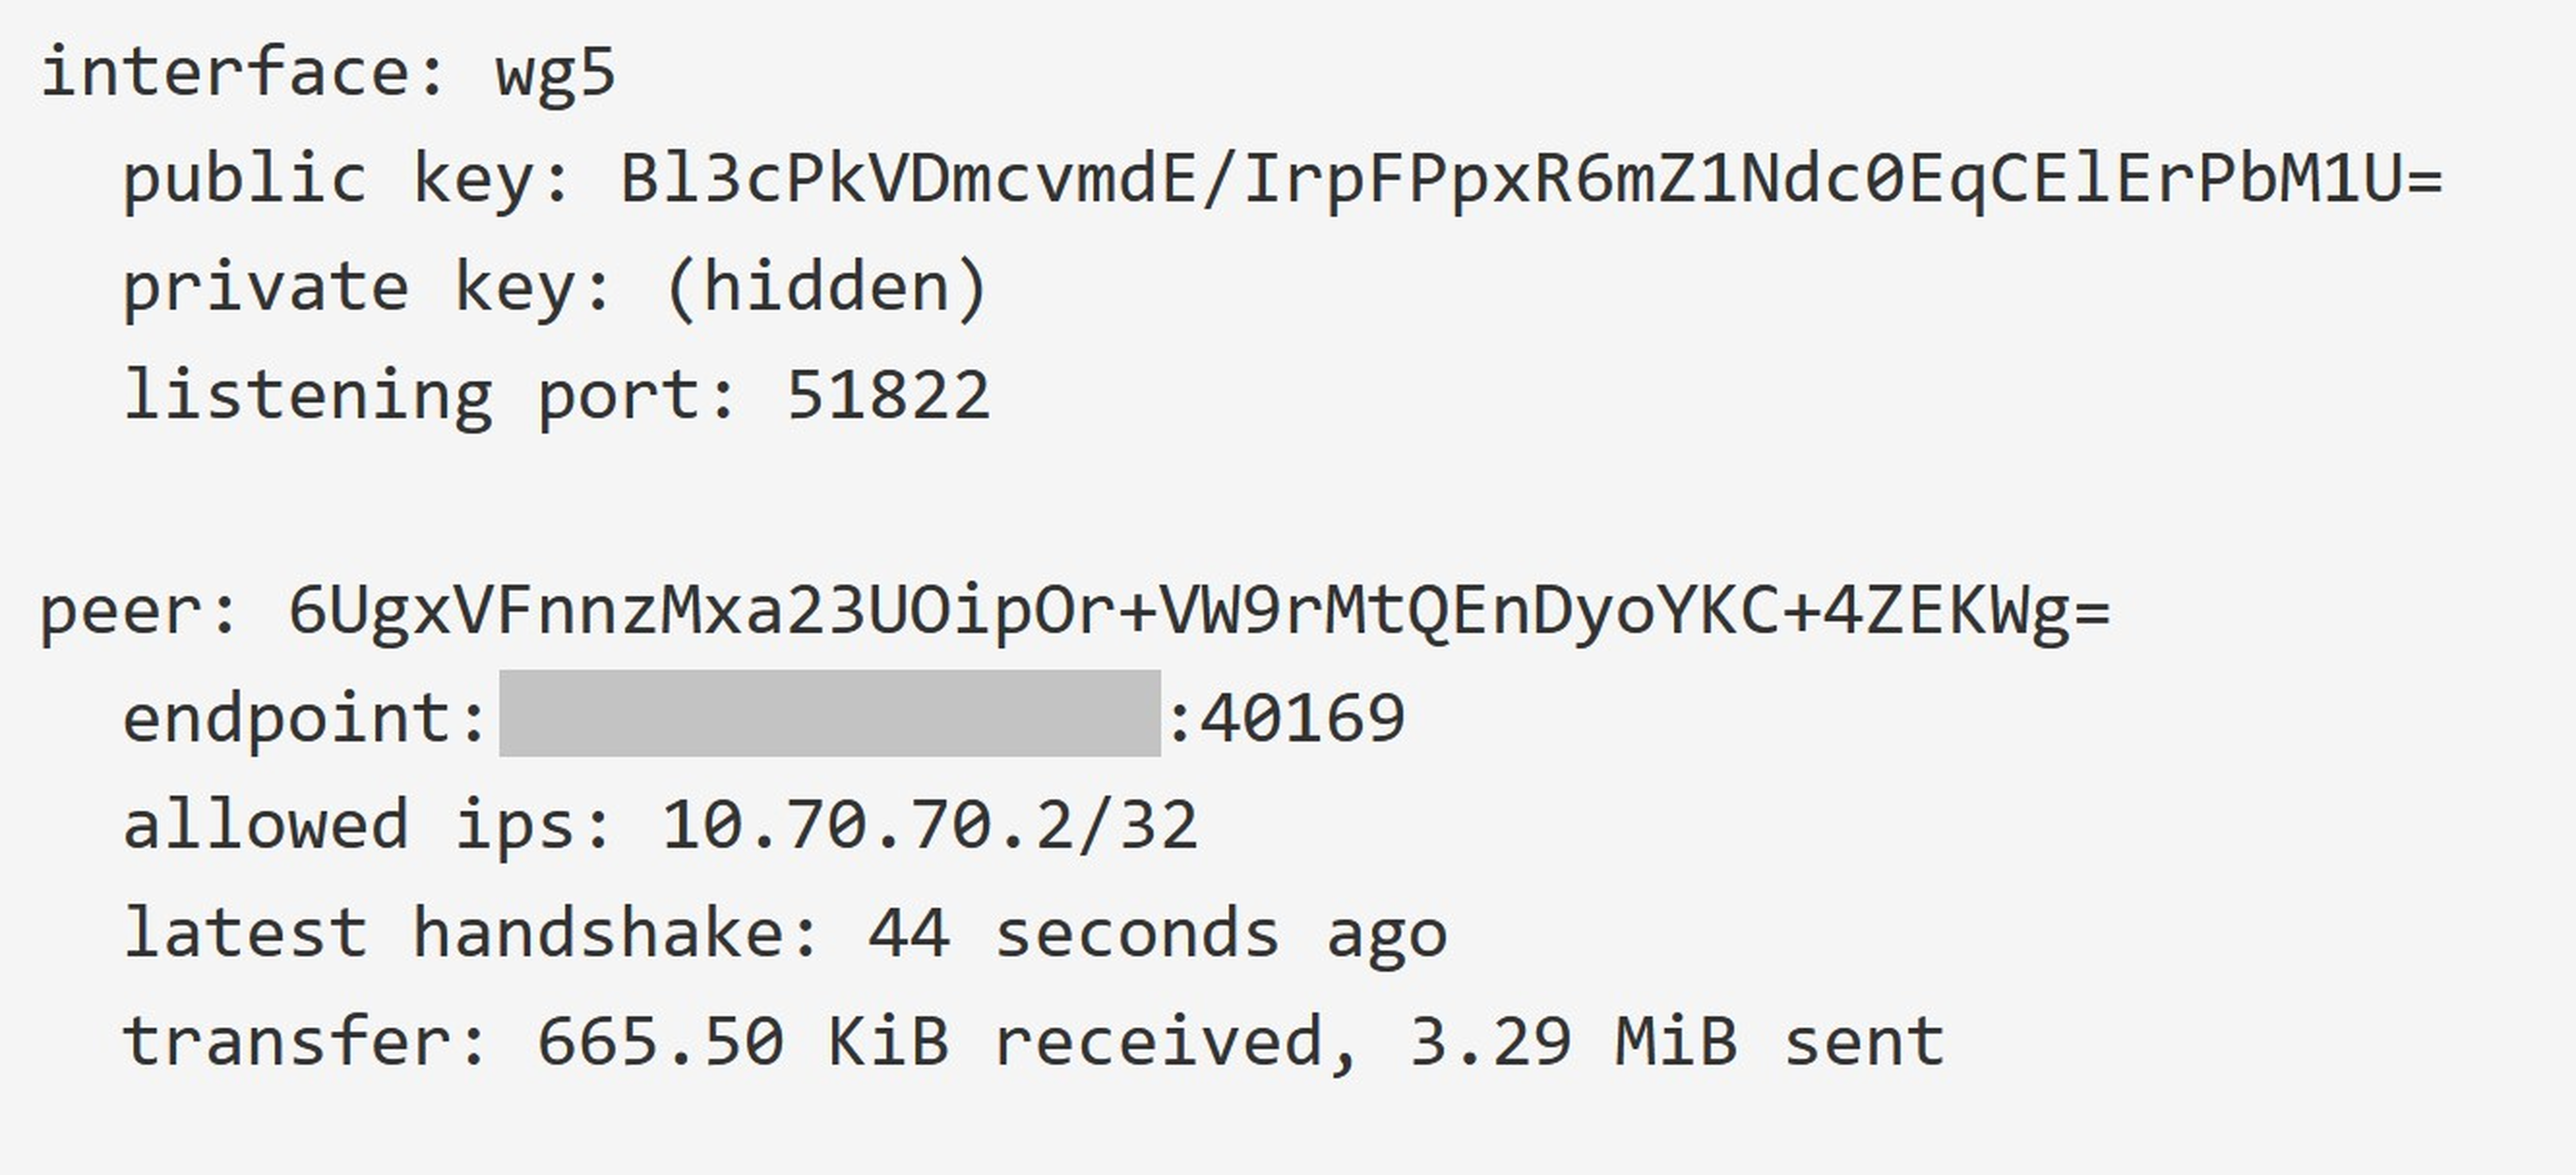
3. Mobile Phone: Tap the Tunnel's name to bring up interface details.
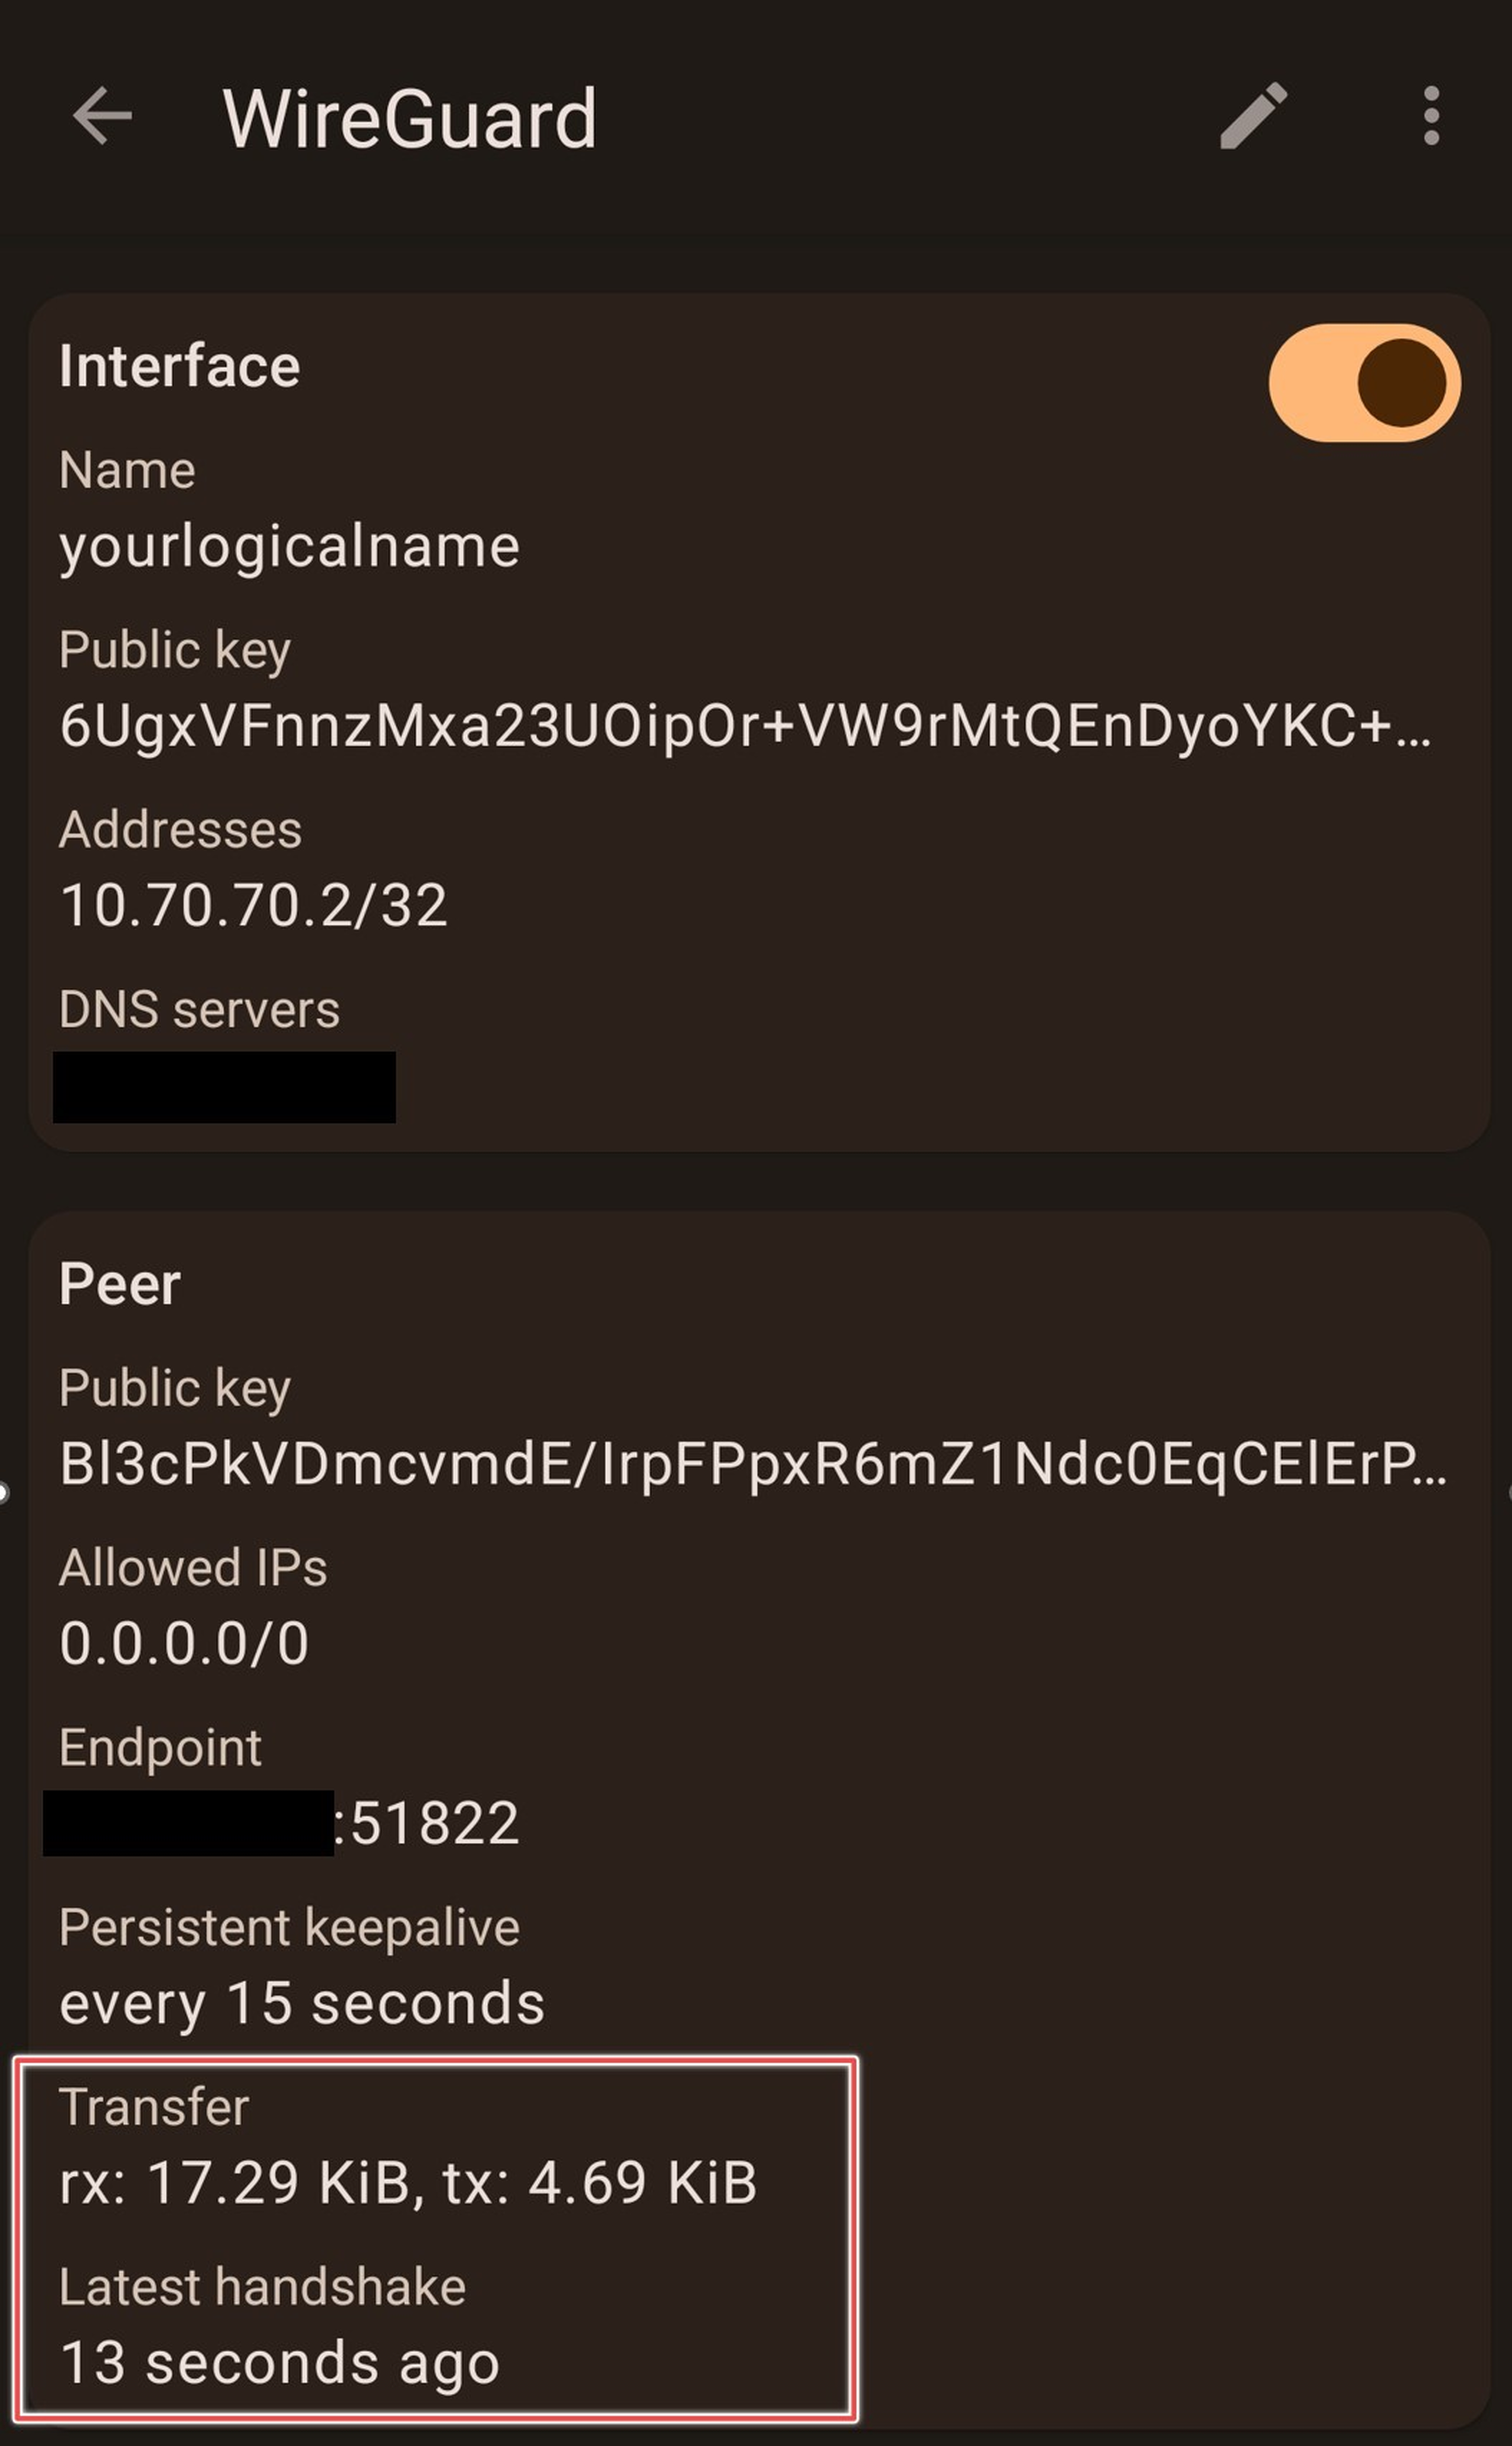
WireGuard doesn't notify you if the tunnel fails. Signs of a tunnel issue are over ~ 3 minutes since handshake. This can result from changes in the peer's network settings.
Basic Troubleshooting
- Apply Settings: Ensure all changes you've made across different menus have been appropriately saved and applied.
- Restart Tunnels: Attempt to restart the WireGuard tunnels on both your OPNsense router and mobile phone.
- Use Persistent Keepalive: If you're dealing with a NAT situation, consider setting a persistent 'Keepalive' to maintain the connection and prevent it from dropping.
- Modify Peer Settings: Experiment with setting up a different peer or changing networks on the current peer (your mobile phone). If successful, these adjustments indicate where the problem lies.
Wrap Up
Most of the work in this How To focused on configuring our OPNsense Router to handle WireGuard properly. As we can see, adding additional peers (phones, laptops, etc.) is not difficult now that the groundwork has been laid.
Properly configured, the WireGuard should prove to be a secure, reliable way to access your home network remotely.